Setup Local Kafka With Docker


When writing Kafka producer or consumer applications, we often have the need to setup a local Kafka cluster for debugging purposes. In this post, we will look how we can setup a local Kafka cluster within Docker, how we can make it accessible from our localhost and how we can use Kafkacat to setup a producer and consumer to test our setup.
Setup Local Kafka
The easiest way to setup Kafka locally is to use Docker with docker-compose. Docker alone isn’t sufficient because Kafka needs Zookeeper, so we use docker-compose to setup a multi-container application. For the rest of this post, I will be using the Dockerfile and docker-compose.yml from wurstmeister/kafka-docker repository which comes packed with tools (e.g. auto create topics).
After pulling the repository we can navigate to the root and update the default docker-compose.yml to the following:
1
2
3
4
5
6
7
8
9
10
11
12
13
14
15
16
version: '2'
services:
  zookeeper:
    image: wurstmeister/zookeeper
    ports:
      - "2181:2181"
  kafka:
    build: .
    ports:
      - "9092:9092"
    environment:
      KAFKA_ZOOKEEPER_CONNECT: zookeeper:2181
      KAFKA_LISTENERS: PLAINTEXT://kafka:9092
      KAFKA_CREATE_TOPICS: "kimtopic:2:1"
    volumes:
      - /var/run/docker.sock:/var/run/docker.sock
Those environment settings correspond to the settings on the broker:
KAFKA_ZOOKEEPER_CONNECTidentifies the zookeeper container address, we specifyzookeeperwhich is the name of our service and Docker will know how to route the traffic properly,KAFKA_LISTENERSidentifies the internal listeners for brokers to communicate between themselves,KAFKA_CREATE_TOPICSspecifies an autocreation of a topic namekimtopicwith 2 partitions and 1 replica - this is handled bycreate-toppics.shin the repository.
In this simple configuration, we directly expose the internal communication address so external client can directly communicate. This allows us to have a quick definition of the plain text schema with PLAINTEXT://.
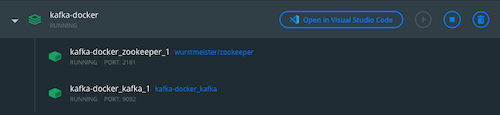
Assuming we have Docker installed and docker-compose installed we then run docker-compose up -d from the root. up means spin up the containers, and -d specifies detached. After that, we can look at Docker dashboard and we should see our Kafka cluster being started:
We can also simulate an internal and external type of setup where our brockers communicate with an internal address:
1
2
3
4
5
6
7
8
9
10
11
12
13
14
15
16
17
18
19
version: '2'
services:
  zookeeper:
    image: wurstmeister/zookeeper
    ports:
      - "2181:2181"
  kafka:
    build: .
    ports:
      - "9094:9094"
    environment:
      KAFKA_ZOOKEEPER_CONNECT: zookeeper:2181
      KAFKA_LISTENERS: INTERNAL://kafka:9092,OUTSIDE://kafka:9094
      KAFKA_ADVERTISED_LISTENERS: INTERNAL://kafka:9092,OUTSIDE://localhost:9094
      KAFKA_INTER_BROKER_LISTENER_NAME: INTERNAL
      KAFKA_LISTENER_SECURITY_PROTOCOL_MAP: INTERNAL:PLAINTEXT,OUTSIDE:PLAINTEXT
      KAFKA_CREATE_TOPICS: "abcd:2:1"
    volumes:
      - /var/run/docker.sock:/var/run/docker.sock
This is done by specifying two listeners:
INTERNAL://kafka:9092EXTERNAL://kafka:9094
INTERNAL and EXTERNAL being provided in place of the schema, we need to have a map KAFKA_LISTENER_SECURITY_PROTOCOL_MAP which indicates the schema of each:
NTERNAL:PLAINTEXTOUTSIDE:PLAINTEXT
In that case we also need to specify which one is the internal listener, here INTERNAL. And because we have a special listener for outsider communication, we have to specify the advertised listeners which will be the listeners the clients can connect to by setting KAFKA_ADVERTISED_LISTENERS.
Notice that on KAFKA_LISTENERS, we set that the broker will listen on OUTSIDE://kafka:9094 but from the advertised listener, we set OUTSIDE://localhost:9094. That’s because we are exposing the port 9094 so we will be able to connect on localhost:9094.
For the rest of the post, we will use this setup and connect via 9094.
Produce and Consume with Kafkacat
Once we have our Kafka setup, we can use kafkacat, a CLI for Kafka to test our setup. The first test would be to list the topics on the broker. This can be achieved with -L:
1
2
3
4
5
6
7
8
❯ kafkacat -L -b localhost:9094
Metadata for all topics (from broker 1001: localhost:9094/1001):
 1 brokers:
  broker 1001 at localhost:9094 (controller)
 1 topics:
  topic "kimtopic" with 2 partitions:
    partition 0, leader 1001, replicas: 1001, isrs: 1001
    partition 1, leader 1001, replicas: 1001, isrs: 1001
Here we see that we have a broker which we connect to via localhost:9094, it has one topic which we created kimtopic and has 2 partitions 0 and 1.
Next we can create a producer on the topic with -P:
1
kafkacat -P -b localhost:9094 -t kimtopic
And lastly a consumer with -C:
1
kafkacat -C -b localhost:9094 -G test-consumer-group kimtopic
We use -G to create a consumer group called test-consumer-group. Once we have both setup, we can start publishing on the topic and we should see data coming out of the consumer.
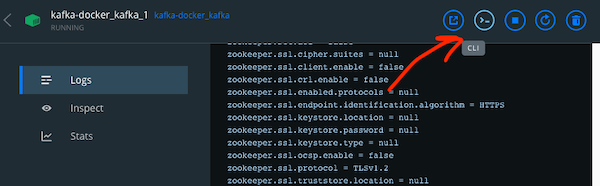
As we have data being consumed by the consumer, we can verify that the offset is being properly committed by using the scripts which come built baked with Kafka. To use those scripts, we can open a CLI within the container:
And use kafka-consumer-group.sh:
1
2
3
4
5
/ # kafka-consumer-groups.sh --bootstrap-server kafka:9092 --all-groups --all-topics --describe

GROUP               TOPIC           PARTITION  CURRENT-OFFSET  LOG-END-OFFSET  LAG             CONSUMER-ID                                  HOST            CLIENT-ID
test-consumer-group kimtopic        0          3               4               1               rdkafka-ca827dfb-0c0a-430e-8184-708d1ad95315 /172.23.0.1     rdkafka
test-consumer-group kimtopic        1          2               2               0               rdkafka-ca827dfb-0c0a-430e-8184-708d1ad95315 /172.23.0.1     rdkafka
Here we can see that we have two partitions, both of them maintain a separate offset for a consumer group. We can also see that our single consumer subscribes to both at the moment and partition 0 has a lag of 1 which is calculated via LOG-END-OFFSET minus CURRENT-OFFSET.
There is bunch of scripts which comes with Kafka which are useful to understand how Kafka works:
1
2
3
4
5
6
7
8
9
10
11
12
kafka-acls.sh                        kafka-mirror-maker.sh
kafka-broker-api-versions.sh         kafka-preferred-replica-election.sh
kafka-configs.sh                     kafka-producer-perf-test.sh
kafka-console-consumer.sh            kafka-reassign-partitions.sh
kafka-console-producer.sh            kafka-replica-verification.sh
kafka-consumer-groups.sh             kafka-run-class.sh
kafka-consumer-perf-test.sh          kafka-server-start.sh
kafka-delegation-tokens.sh           kafka-server-stop.sh
kafka-delete-records.sh              kafka-streams-application-reset.sh
kafka-dump-log.sh                    kafka-topics.sh
kafka-leader-election.sh             kafka-verifiable-consumer.sh
kafka-log-dirs.sh                    kafka-verifiable-producer.sh
And that concludes today’s post, I hope you liked this post and I see you on the next one!
Conclusion
In today’s post we looked at how we could setup Kafka localy with Docker. We looked at what the docker-compose.yml file was suppsoed to have in order to have a descent Kafka setup and how we could use Kafkacat to explore our setup. I hope you liked this post and I see you on the next one!
Kafka Posts
- Introduction to Kafkacat CLI for Kafka
- Local Kafka Docker Setup
- Kafka Consumer and Producer in dotnet
- Kafka Schema Registry with Avro
- Kafka Topics, Partitions and Consumer Groups
- Kafka Offsets and Statistics
- Kafka Log Compaction


