useReducer
or useState
or useContext
, it can become expensive to render components. If we let the framework handle rendering, all components and children components will be rendered if the parent uses state or context hooks or an action is dispatch into the reducer hook. Today we will look at optimisation to stop the rendering propagation for components which do not need to be rendered.
The first technique is to organise state update to be localised into components that need updates. We can prevent rendering of all children elements by removing state change from the parent.
For example:
1
2
3
4
5
6
7
8
9
10
11
12
13
14
15
16
17
const MyChildComp: FC<{ toggled: boolean; onClick: () => void }> = ({
toggled,
onClick,
}) => {
return (
<>
<div>{toggled ? "hello" : "bye"}</div>
<button onClick={() => onClick()}>Click</button>
</>
);
};
const MyParentComp: FC = () => {
const [state, setState] = useState(true);
return <MyChildComp toggled={state} onClick={() => setState(!state)} />;
};
If we have a state located in the parent component but is being used within the child component, any changes of the state will trigger a render of both components and any other children components of the parent component even if they don’t need the state.
Identifying such pattern can help in reducing rendering by moving the state closer to where it gets mutated, which mean in the example above, moving the state hook inside the child component rather than having it on the parent.
But there are times where it is better to keep the state at the parent level and breakdown parts of the state to display in children components.
In that case any update will trigger a render of all components. To prevent that, we can use memo. This will make sure that the component is only rendered if the props have changed.
For example in a reducer hook:
1
2
3
4
5
6
7
8
9
10
11
12
13
14
15
16
17
18
19
20
21
22
23
24
25
26
27
28
29
30
31
32
33
34
35
36
37
38
39
40
41
42
43
44
45
46
47
48
49
50
51
52
53
54
55
56
57
58
59
60
61
62
63
64
65
66
67
68
interface CounterState {
count: number;
name: string;
}
interface IncrementCounter {
kind: "Increment";
}
interface ChangeName {
kind: "ChangeName";
name: string;
}
type CounterAction = IncrementCounter | ChangeName;
const reducer = (state: CounterState, action: CounterAction): CounterState => {
switch (action.kind) {
case "Increment":
return { count: state.count + 1, name: state.name };
case "ChangeName":
return { count: state.count, name: action.name };
}
};
const DispatcherContext = React.createContext<
{ dispatch: Dispatch<CounterAction> } | undefined
>(undefined);
const ButtonComponent: FC = () => {
const dispatcher = useContext(DispatcherContext);
return (
<div>
<button onClick={() => dispatcher?.dispatch({ kind: "Increment" })}>
Increment
</button>
<button
onClick={() =>
dispatcher?.dispatch({ kind: "ChangeName", name: "Hello " })
}
>
Change name
</button>
</div>
);
};
const NameDisplay: FC<{ name: string }> = ({ name }) => {
return <>{name}</>;
};
const App: FC = () => {
const initialState = {
count: 0,
name: "",
};
const [state, dispatch] = useReducer(reducer, initialState);
return (
<DispatcherContext.Provider value=>
<ButtonComponent></ButtonComponent>
<p>{state.count}</p>
<NameDisplay name={state.name} />
</DispatcherContext.Provider>
);
};
We have a reducer which keeps track of a counter with name and we have NameDisplay
, a component which should render only if the state.name
has changed. Currently any change on the state will trigger a render. To prevent that, we can use memo
.
1
2
3
const NameDisplay: FC<{ name: string }> = memo(({ name }) => {
return <>{name}</>;
});
Lastly when managing a large state object with reducer, it is sometime easier to pass as prop the whole state. For example instead of passing just the name, we pass the whole state:
1
2
3
const NameDisplay: FC<{ state: CounterState }> = memo(({ state }) => {
return <>{state.name}</>;
});
If we forward the whole state as prop, even when using memo, the components will still render.
To prevent this, we can use the equality argument from usememo to identify the part of the state that the component cares about and which would trigger rendering.
1
2
3
4
5
6
const NameDisplay: FC<{ state: CounterState }> = memo(
({ state }) => {
return <>{state.name}</>;
},
(cur, next) => cur.state.name === next.state.name
);
And that concludes today’s post!
Today we saw how we could optimise our components to avoid unnecessary rendering. We first saw that by simply reorganising the state, we can remove the need to render certain component. We then saw that by use memo we were able to make the component only render on prop change and lastly if not all values from an object give in prop is needed, we saw that we could use the equality argument to target the exact properties from the prop object. I hope you liked this post and I’ll see you on the next one!
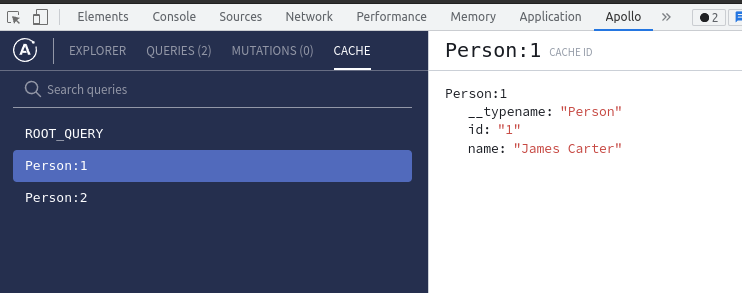
]]>Apollo Client manages a cache for us behind the scene to optimise performance. The data queried are normalized and stored in memory when the same data our queried.
To visualise the cache, we can get the Apollo Client chrome extension and open the developer took to see the cache section.
To modify the fetch policy, we can specify it in the options of useQuery
:
1
2
3
const { loading, error, data } = useQuery<{
books: { title: string; author: { id: string; name: string } }[];
}>(BOOKS, { variables: { bookId: id }, fetchPolicy: "cache-and-network" });
For example here we’ve specified cache-and-network
. There are a number of options available to manage the cache:
cache-first
hits the cache then if not present hit the servercache-only
only looks at the cachenetwork-only
always consult the server but saves the result in cachecache-and-network
check in cache while also consulting server, and replace with server data if changedno-cache
consults the server and does not cachestandby
same as cache-first except the query does not update the valuecache-first
is the default behaviour, to use any other one, we must overwrite it.
Here is a working example to test the fetch policies.
We have a server with a query accepting a book ID.
1
2
3
4
5
6
7
8
9
10
11
12
13
14
15
16
17
18
19
20
21
22
23
24
25
26
27
28
29
30
31
32
33
34
35
36
37
38
39
40
41
42
43
44
45
46
47
48
49
50
51
52
53
54
import { ApolloServer, gql } from "apollo-server";
const typeDefs = gql`
type Person {
id: ID!
name: String!
}
type Book {
id: ID!
title: String!
author: Person!
}
type Query {
books(id: ID): [Book]
}
`;
const resolvers = {
Query: {
books: (_: any, args: any) => {
console.log(new Date().toISOString(), args.id);
return [
{
id: "1",
title: "Made of Wolves",
authorId: "1",
},
{
id: "2",
title: "The Visitor in the City",
authorId: "2",
},
].filter((b) => !args.id || b.id === args.id);
},
},
Book: {
author: (parent: any) => {
return {
id: parent.authorId,
name: parent.authorId == "1" ? "James Carter" : "Arthur Novotic",
};
},
},
};
async function main() {
const server = new ApolloServer({ typeDefs, resolvers });
await server.listen(4000);
console.log("Server started on http://localhost:4000");
}
main();
And from our React app, we query the resolver:
1
2
3
4
5
6
7
8
9
10
11
12
13
14
15
16
17
18
19
20
21
22
23
24
25
26
27
28
29
30
31
32
33
34
35
36
const BOOKS = gql`
query Query($bookId: ID) {
books(id: $bookId) {
title
author {
id
name
}
}
}
`;
const TestComp: FC = () => {
const [id, setId] = useState<string>("");
const { loading, error, data } = useQuery<{
books: { title: string; author: { id: string; name: string } }[];
}>(BOOKS, { variables: { bookId: id }, fetchPolicy: "cache-and-network" });
if (loading) return <p>Loading...</p>;
if (error) return <p>Error :(</p>;
return (
<>
<button onClick={() => setId("")}>Get all books</button>
<button onClick={() => setId("1")}>Get book 1</button>
{data &&
data.books.map((b) => {
return (
<div>
{b.title} - {b.author.name}
</div>
);
})}
</>
);
};
If we use the default cache-first
, after hitting once Get all books
and hitting Get book 1
buttons then back to Get all books
, we can see that the backend is not consulted. If we change it to cache-and-network
, we can see that the data comes from cache but the call is still made to the backend to update the data if it has changed.
And that conludes today’s post!
In today’s post, we looked at fetch policies in Apollo client queries. We started by looking at how we could explore our in memory cache with Apollo client extension, and then moved on to look at each fetch policies available. I hope you liked this post and I’ll see you on the next one!
We start first by re-creating our previous server using Apollo server (if you haven’t done that, you can follow our previous post).
1
2
3
4
5
6
7
8
9
10
11
12
13
14
15
16
17
18
19
20
21
22
23
24
25
26
27
28
29
30
31
32
33
34
35
36
37
38
39
40
41
42
43
44
45
46
47
48
import { ApolloServer, gql } from "apollo-server";
const typeDefs = gql`
type Person {
id: ID!
name: String!
}
type Book {
title: String
author: Person
}
type Query {
books: [Book]
}
`;
const resolvers = {
Query: {
books: () => [
{
title: "Made of Wolves",
authorId: "1",
},
{
title: "The Visitor in the City",
authorId: "2",
},
],
},
Book: {
author: (parent: any) => {
return {
id: parent.authorId,
name: parent.authorId == "1" ? "James Carter" : "Arthur Novotic",
};
},
},
};
async function main() {
const server = new ApolloServer({ typeDefs, resolvers });
await server.listen(4000);
console.log("Server started on http://localhost:4000");
}
main();
This will setup a GraphQL server with a single query books
and a field resolver for Book.author
. We can now start to build our frontend to query our server.
We start first by installing Apollo client:
1
npm install @apollo/client graphql
And we then create a client in our index.tsx
file:
1
2
3
4
5
6
7
8
9
10
11
12
import {
ApolloClient,
InMemoryCache,
ApolloProvider,
useQuery,
gql,
} from "@apollo/client";
const client = new ApolloClient({
uri: "http://localhost:4000",
cache: new InMemoryCache(),
});
If we add a query on the client, we can test that the client is working:
1
2
3
4
5
6
7
8
9
10
11
12
13
14
15
client
.query({
query: gql`
query Query {
books {
title
author {
id
name
}
}
}
`,
})
.then((result) => console.log(result));
And we’ll see the result in the console.
Now querying directly with the client isn’t the recommended way. Instead, we’ll use the build-in hooks provided. For us as we have a query, we’ll use useQuery
.
Before being able to use hooks, we need to register the client by wrapping our app into the ApolloProvider
:
1
2
3
4
5
6
7
8
9
10
11
12
13
const client = new ApolloClient({
uri: "http://localhost:4000",
cache: new InMemoryCache(),
});
ReactDOM.render(
<React.StrictMode>
<ApolloProvider client={client}>
<App />
</ApolloProvider>
</React.StrictMode>,
document.getElementById("root")
);
And we can then use useQuery
:
1
2
3
4
5
6
7
8
9
10
11
12
13
14
15
16
17
18
19
20
21
22
23
24
25
26
27
28
29
30
31
32
33
34
35
36
37
38
39
40
41
42
43
44
45
46
import { gql, useQuery } from "@apollo/client";
import React, { FC } from "react";
const BOOKS = gql`
query GetBooks {
books {
title
author {
id
name
}
}
}
`;
const TestComp: FC = () => {
const { data, loading, error } = useQuery<{
books: { title: string; author: { id: string; name: string } }[];
}>(BOOKS);
if (loading) return <p>Loading...</p>;
if (error) return <p>Error :(</p>;
return (
<>
{data &&
data.books.map((b) => {
return (
<div>
{b.title} - {b.author.name}
</div>
);
})}
</>
);
};
function App() {
return (
<div className="App">
<TestComp></TestComp>
</div>
);
}
export default App;
We can see that useQuery
takes a gql
query as parameter, which is the definition of our GraphQL query. The advantage of using useQuery
hook is tha data
, loading
and error
will get update as the client queries the data which will in turn trigger a rendering of the component.
This allows us to create specific logic to handle querying, error state and display of data.
Other than the useQuery
hook, we also have access to the useMutation
hook for GraphQL mutations and plenty of other configurations for the client.
And that concludes today’s post!
Today we looked at how we could setup Apollo Client to query a GraphQL server. We started by a quick recap on setting up a server and then moved on to setup Apollo Client and completed the post by looking at the query hook provided by Apollo Client. I hope you liked this post and I’ll see you on the next one!
WITH
queries, can be used to create auxiliary queries that can be used in larger queries. They can be used to breakdown complex queries into multiple simpler queries which are then used in a primary statement or they can also be used to write recursive queries. In today’s post, we will look at how to define CTE with examples in Postgres.
Breaking down complex queries using common table expression can be done as followed:
1
2
3
4
5
6
7
8
9
10
11
12
13
14
15
with salaries as (
select
id,
title,
(case when remuneration < 100 then 'low' when remuneration < 500 then 'medium' else 'high' end) as category
from job
), groups as (
select
count(*) as job_count,
max(category) as category
from salaries
group by category
)
select * from groups
where category != 'low'
We start by using with
keyword to create a table result salaries
which will contain the jobs with a salary categorised between low
, medium
and high
.
We then continue with another common table by separating with a comma, and use salaries
to group by the category.
And lastly we use the common tables into the primary statement which exclude low
.
We can see how this notation can be used to breakdown queries into small parts and assembling them to be usable in the primary statement.
Another usage of CTE is to execute recursive queries. The format of a recursive query is as followed:
1
2
3
4
5
6
with recursive t(n) as (
values (1)
union all
select n+1 from t where n < 10
)
select * from t
which will return:
1
2
3
4
5
6
7
8
9
10
11
12
13
14
15
16
+----+
| n |
|----|
| 1 |
| 2 |
| 3 |
| 4 |
| 5 |
| 6 |
| 7 |
| 8 |
| 9 |
| 10 |
+----+
SELECT 10
Time: 0.003s
The definition of the recursive CTE is a non-recursive statement, followed by union
or union all
and a recursive statement.
The first non-recursive statement is the initial dataset extracted, where the recursive statement will be applied to. At each application of the recursive statement, the data is appended following either union
or union all
, and the process is repeated until there is no more item returned by the recursive statement.
1
2
3
4
5
6
7
8
with recursive all_jobs as (
select id, title, parentJobId from job where id = '1'
union all
select j.id, j.title, j.parentJobId
from job j
join all_jobs pj on pj.id = j.parentJobId
)
select * from all_jobs
With this query we are able to recursively query all the children of job 1
at all levels. This is achieved by first getting job 1
in the non-recursive statement, then on the recursive statement, join the table back and retrieve rows that have the jobs as parent.
Lastly just like regular CTE, the recursive CTE can also be combined:
1
2
3
4
5
6
7
8
9
10
11
12
13
14
15
with recursive all_jobs as (
select id, title, parentJobId, remuneration from job where id = '1'
union all
select j.id, j.title, j.parentJobId, j.remuneration
from job j
join all_jobs pj on pj.id = j.parentJobId
), salaries as (
select
id,
title,
parentJobId,
(case when remuneration < 100 then 'low' when remuneration < 500 then 'medium' else 'high' end) as category
from all_jobs
)
select * from salaries
Just as an example we added our previous auxiliary statement which categories the jobs.
And that concludes today’s post on CTE!
In today’s post, we looked at Postgres common table expression. We started by looking at how they could be used to breakdown complex queries in smaller pieces and we then moved on to look at how we could write recursive queries. I hope you liked this post, and I’ll see you on the next one!
useReducer
hook in React allows us to manage state in a redux manner. This is useful for handling complex state in a single object, as opposed to useState
which is better used with single variable state. With useReducer
, we can define a reducer, a set of actions to interact with the state and use a dispatcher to dispatch the actions from our component. In today’s post we will look at how we can use useReducer
with example.
useReducer
HookuseReduce
provides a way to manage state in a Redux manner. The main components are the reducer and the actions. We start by defininig the state in an interface:
1
2
3
interface CounterState {
count: number;
}
Then we can define the actions that we will use to modify the state:
1
2
3
4
5
6
7
8
9
10
11
12
13
interface IncrementCounter {
kind: "Increment";
}
interface DecrementCounter {
kind: "Decrement";
}
interface ResetCount {
kind: "Reset";
}
type CounterAction = IncrementCounter | DecrementCounter | ResetCount;
The actions should ideally all share a property kind
or type
which will be used in the reducer to identify which action has been dispatch.
Next we define the reducer:
1
2
3
4
5
6
7
8
9
10
const reducer = (state: CounterState, action: CounterAction): CounterState => {
switch (action.kind) {
case "Increment":
return { count: state.count + 1 };
case "Decrement":
return { count: state.count - 1 };
case "Reset":
return { count: 0 };
}
};
We do a switch on the property that determines the action to execute and we apply to the state. A reducer is a function which takes the previous state and the action, and return the next state.
We now have all the components to use useReducer
:
1
2
3
4
5
6
7
8
9
10
11
12
13
14
15
16
const App: FC = () => {
const initialState = {
count: 0,
};
const [state, dispatch] = useReducer(reducer, initialState);
return (
<>
<button onClick={() => dispatch({ kind: "Increment" })}>Increment</button>
<button onClick={() => dispatch({ kind: "Decrement" })}>Decrement</button>
<button onClick={() => dispatch({ kind: "Reset" })}>Reset</button>
<p>{state.count}</p>
</>
);
};
We can see that useReducer
returned a tuple composed by the state and a dispatch
function. The dispatch
function is used to dispatch an action from our component.
The advantage of using a reducer with actions is that we can pass down dispatch
to provide all functionalities to child components.
1
2
3
4
5
6
7
8
9
10
11
const ButtonComponent: FC<{ dispatch: Dispatch<CounterAction> }> = ({
dispatch,
}) => {
return (
<div>
<button onClick={() => dispatch({ kind: "Increment" })}>Increment</button>
<button onClick={() => dispatch({ kind: "Decrement" })}>Decrement</button>
<button onClick={() => dispatch({ kind: "Reset" })}>Reset</button>
</div>
);
};
We can see that we provided all the functionalities from a single props dispatch
.
1
2
3
4
5
6
7
8
9
10
11
12
13
14
const App: FC = () => {
const initialState = {
count: 0,
};
const [state, dispatch] = useReducer(reducer, initialState);
return (
<>
<ButtonComponent dispatch={dispatch}></ButtonComponent>
<p>{state.count}</p>
</>
);
};
We can go even a step further if we want to globally provide the dispatcher to all children, we can provide it in a context:
1
2
3
const DispatcherContext = React.createContext<
{ dispatch: Dispatch<CounterAction> } | undefined
>(undefined);
After defining the context we can use it in our children components:
1
2
3
4
5
6
7
8
9
10
11
12
13
14
15
16
17
const ButtonComponent: FC = () => {
const dispatcher = useContext(DispatcherContext);
return (
<div>
<button onClick={() => dispatcher?.dispatch({ kind: "Increment" })}>
Increment
</button>
<button onClick={() => dispatcher?.dispatch({ kind: "Decrement" })}>
Decrement
</button>
<button onClick={() => dispatcher?.dispatch({ kind: "Reset" })}>
Reset
</button>
</div>
);
};
We can see that we no longer need to pass the dispatch
function down and instead we can get it from the context using the useContext
hook.
And lastly we provider it from the parent component:
1
2
3
4
5
6
7
8
9
10
11
12
13
14
const App: FC = () => {
const initialState = {
count: 0,
};
const [state, dispatch] = useReducer(reducer, initialState);
return (
<DispatcherContext.Provider value=>
<ButtonComponent></ButtonComponent>
<p>{state.count}</p>
</DispatcherContext.Provider>
);
};
And that concludes today’s post!
Today we looked at how to use useReducer
hook to implement state management in a Redux manner in React. We started by looking at how to use the hook, we then moved on to look at the different options we had to provide functionality of the parent state to child components. I hope you liked this post and I’ll see you on the next one!
useMemo
hook in React can be used to memoize values. Memoization is used as an optimization by caching previous result of computation and directly returning the result when teh same inputs are requested. In today’s post, we’ll look at how we can use useMemo
.
useMemo
HookUnderstanding memo with an example is straight forward:
1
2
3
4
5
6
7
8
9
10
const MyComponent: FC<{ msg: string }> = ({ msg }) => {
const appendTest = (message: string) => {
console.log("called");
return message + " test";
};
const value = appendTest(msg);
return <>{value}</>;
};
We have a component accepting a prop msg
, which internally has a function declared which gets called within the body of our function component. The fact that it is defined and called within the body makes it such that at every render, the function appendTest
will be called, regardless of whether msg
has changed or not.
We can see that by checking the console log where we print "called"
.
To optimize those calls, we can wrap the call to appendTest
into useMemo
:
1
const value = useMemo(() => appendTest(msg), [msg]);
The second argument is an array which identify the dependencies on which the memoized function will be reexecuted. It’s important to have that array right as it can lead to bugs where the result is still based on passed values. It is recommended to use the exhaustive-deps
rule to make sure we don’t forget any dependencies.
The dependency would include whatever argument is passed to appendTest
but also any dependency referenced within appendTest
.
Here is a full example:
1
2
3
4
5
6
7
8
9
10
11
12
13
14
15
16
17
18
19
20
21
22
23
24
25
26
27
28
29
30
31
const MyComponent: FC<{ msg: string }> = ({ msg }) => {
const appendTest = (message: string) => {
console.log("called");
return message + " test";
};
const value = useMemo(() => appendTest(msg), [msg]);
return <>{value}</>;
};
const App: FC = () => {
const [state, setState] = useState("");
const [date, setDate] = useState(new Date().toISOString());
useEffect(() => {
const interval = setInterval(() => {
setDate(new Date().toISOString());
}, 1000);
return () => clearInterval(interval);
}, []);
return (
<>
<button onClick={() => setState(new Date().toISOString())}>Click</button>
<MyComponent msg={state}></MyComponent>
<p>{date}</p>
</>
);
};
By running this example we can see that the memo is caching the result of appendTest
as even thought MyComponent
is being rendered at every change of our date
state, the call to appendTest
only happens when we click the button.
And that concludes today’s post!
Today we looked at useMemo
hook. We started by explaining what the purpose of memoization was, and then moved on to using the hook in our example seeing how it changes the behaviour of the code. Hope you liked this post and I’ll see you on the next one!
Callback
hook in React can be used to memoized a callback function to skip unnecessary rendering. In today’s post we will see why we would useCallback
hook.
To understand what useCallback
does, we start by creating a child component:
1
2
3
4
const MyChildComponent: React.FC<{ say: () => string }> = ({ say }) => {
console.log("My child component rendered", new Date().toISOString());
return <p>{say()}</p>;
};
We have a component which takes as input a function say
and would log on each render a message.
We then use this component in a main component:
1
2
3
4
5
6
7
8
9
10
11
12
13
14
15
const App: React.FC = () => {
const [state, setState] = useState(true);
const say = () => {
return state ? "Hello" : "Bye";
};
return (
<>
<p>{state ? "Hello" : "Bye"}</p>
<button onClick={() => setState(!state)}>Toggle</button>
<MyChildComponent say={say}></MyChildComponent>
</>
);
};
As we click on the button, we can see the message printed in the console. On each click, the child component renders.
Now let’s add another state into App
which would just display the current time.
1
2
3
4
5
6
7
8
9
10
11
12
13
14
15
16
17
18
19
20
21
22
23
24
25
const App: React.FC = () => {
const [state, setState] = useState(true);
const [otherState, setOtherState] = useState(new Date().toISOString());
const say = () => {
return state ? "Hello" : "Bye";
};
useEffect(() => {
const interval = setInterval(() => {
setOtherState(new Date().toISOString());
}, 5000);
return () => clearInterval(interval);
}, []);
return (
<>
<p>{state ? "Hello" : "Bye"}</p>
<p>{otherState}</p>
<button onClick={() => setState(!state)}>Toggle</button>
<MyChildComponent say={say}></MyChildComponent>
</>
);
};
We added otherState
with an interval triggering a change of otherState
every five seconds. What we observe is that our child component still render every five seconds even though it does not depend on otherState
.
In fact, it only depends on the function say
but because the parent component is rendered again, React will trigger a render on all child components. This behaviour is the most logical behaviour and will guarantee that all components that need rendering will be up-to-date.
But in our case here, we are defining FunctionComponent
(or FC
, which is a type alias) which depend only on their props. The entire logic inside our components would only need a rendering triggered from the parent if their props change.
This can be solved by using memo
:
1
2
3
4
const MyChildComponent: React.FC<{ say: () => string }> = memo(({ say }) => {
console.log("My child component rendered", new Date().toISOString());
return <p>{say()}</p>;
});
We simply wrap our function component into memo(...)
which would provide a performance boost by memoizing the result of the function component and return it to the parent for renders that don’t include any props change for that component.
And we finally come to the problem:
After wrapping with memo
, we can see that the child component is still rendered on each change of otherState
. The reason for that is that each functions and variables within the parent component App
are recreated at each render, and because functions equality is treated as reference equality, the previous say
will never be the same as the next say
function.
Now that we understand the problem, we can see how useCallback
solves it.
useCallback
HookuseCallback
can be used to create a value holding a reference to same function on each render:
1
2
3
const say = useCallback(() => {
return state ? "Hello" : "Bye";
}, [state]);
We wrap our function into useCallback
, making sure to provide the dependency for when the function would be reevaluated. We end up with the following component:
1
2
3
4
5
6
7
8
9
10
11
12
13
14
15
16
17
18
19
20
21
22
23
24
25
const App: React.FC = () => {
const [state, setState] = useState(true);
const [otherState, setOtherState] = useState(new Date().toISOString());
const say = useCallback(() => {
return state ? "Hello" : "Bye";
}, [state]);
useEffect(() => {
const interval = setInterval(() => {
setOtherState(new Date().toISOString());
}, 5000);
return () => clearInterval(interval);
}, []);
return (
<>
<p>{state ? "Hello" : "Bye"}</p>
<p>{otherState}</p>
<button onClick={() => setState(!state)}>Toggle</button>
<MyChildComponent say={say}></MyChildComponent>
</>
);
};
With the callback defined, we can then see that the child component is no longer rendered. This is thanks to the fact that the reference to say
remains the same unless state
is being updated.
The second argument of useCallback
is crucial as it defines the dependencies in which the callback gets updated. If we forget to add state
in it, we would have state
always equal to its initial value. It’s recommended to enable exhaustive-deps
when using useCallback
as it prevents this sort of bugs.
And that concludes today’s post!
In today’s post we looked at the problem that useCallback
solves. We started by exposing the problem and then showed how we would solve it. I hope you liked this post and I’ll see you on the next one!
Ref
hook in React can be used to keep a mutable reference across multiple renders. In today’s post we will see how we can use useRef
hook and when they are useful.
useRef
HookA Ref
is a reference to a mutable variable which is independent from the rendering. The object returned is a reference to a variable which will live for the full lifetime of the component.
We can create ref using useRef
:
1
const nameRef = useRef<string>("tom");
Then we can reference the variable directly with .current
:
1
cosnole.log(nameRef.current);
A common usecase in React is to use ref to reference a DOM element, for example setting the focus on a input when a component is first displayed:
1
2
3
4
5
6
7
8
9
10
11
12
13
14
15
16
17
18
19
20
21
const TextInputWithFocusButton: React.FC = () => {
const inputEl = useRef<any>(null);
const focusOnInput = () => {
if (inputEl.current) {
inputEl.current.focus();
}
};
useEffect(() => {
focusOnInput();
}, []);
return <input ref={inputEl} type="text" />;
};
const App: React.FC = () => {
return <TextInputWithFocusButton></TextInputWithFocusButton>;
};
export default App;
We can see how input
accepts a ref
which is set from inside to the HTML element. We can then access it through the ref.
More generally, a ref
can be used to store and reference anything that needs to survive render, or always be available at any point disregarding the render cycle. States are also persisted across render but the difference being that a state change will trigger a render while ref
do not trigger render.
Without ref
, we wouldn’t be able to persist the value for example we may be tempted to create a regular variable at the top of our component:
1
let nameRef = 'tom";
But the problem with that is that if the component re-render for any reason; a props change or state change or a parent re-render, nameRef
will reset to 'tom'
.
And that concludes today’s post!
In today’s post we saw how we can use useRef
to keep a mutable variable around during the lifetime of the component. I hope you liked this post and I’ll see you on the next one!
useContext
hook and how we can pair it with useState
to provide a global state to all children components.
useContext
HookuseContext
is used together with createContext
. We start first by creating a context with createContext
:
1
const UserContext = createContext<{ username?: string }>({});
The Context
then can instantiate a Provider
component to provide a value within our template:
1
2
3
4
5
6
7
8
9
const App: React.FC = () => {
return (
<UserContext.Provider value=>
<div>
<MyComponent></MyComponent>
</div>
</UserContext.Provider>
);
};
We can see how we create an instance of the provider with UserContext.Provider
with a value.
Then from any child component, we will then be able to resolve the context using useContext
hook providing the context as an argument:
1
const { username } = useContext(UserContext);
Putting it all together, we have:
UserContext
created with createContext
accessible across all components,UserContext.Provider
in the template at the root,useContext
hook used in any child component where we want to access the context value.1
2
3
4
5
6
7
8
9
10
11
12
13
14
15
16
17
18
19
20
21
22
23
24
25
26
27
28
29
30
31
32
33
34
35
import React, { createContext, useContext } from "react";
import "./App.css";
const UserContext = createContext<{ username?: string }>({});
const MyInnerComponent: React.FC = () => {
const { username } = useContext(UserContext);
return <p>Hello {username}</p>;
};
const MyComponent: React.FC = () => {
const { username } = useContext(UserContext);
return (
<div>
Hello {username}
<p>
<MyInnerComponent></MyInnerComponent>
</p>
</div>
);
};
const App: React.FC = () => {
return (
<UserContext.Provider value=>
<div>
<MyComponent></MyComponent>
</div>
</UserContext.Provider>
);
};
export default App;
We can see that from MyComponent
we can access the context, and from MyInnerComponent
, a child of MyComponent
, we are also able to resolve the context. This removes the necessity of passing the username
as a props on all components.
useState
So far we’ve created a static context which was defined at the beginning. But we can also pair it with useState
and set the value as a state value:
1
2
3
4
5
6
7
8
9
10
11
12
13
14
const App: React.FC = () => {
const [username, setUsername] = useState("tom");
return (
<>
<UserContext.Provider value=>
<div>
<button onClick={() => setUsername("sam")}>Set to Sam</button>
<MyComponent></MyComponent>
</div>
</UserContext.Provider>
</>
);
};
In that way, we are able to update the context and have all children components also have their context value updated. And that concludes today’s post on the context hook!
Today we looked at the context hook in React. We started by looking at how we could use it and moved on to how we could pair it with the state hook to update the context on all components if the value was to change. I hope you liked this post and I’ll see you on the next one!
]]>useEffect
. In today’s post, we’ll look at how to use useEffect
hook and in which context it should be used.
useEffect
HookuseEffect
hook is used to decouple functionality from rendering of the component.
Let’s take the example of a component in an app:
1
2
3
4
5
6
7
8
9
10
11
12
const Example: React.FC<{ count: number }> = ({ count }) => {
const [localCount, setLocalCount] = useState(0);
console.log("", { count, localCount });
return (
<div>
<p>{localCount}</p>
<button onClick={() => setLocalCount(localCount + 1)}>Local count</button>
</div>
);
};
We have an Example
component which accepts a count
and a state counter setting localCount
.
The side effect console.log
will print on each rendering of Example
, if we use it as followed in our main App
:
1
2
3
4
5
6
7
8
9
10
11
12
13
14
15
const App: React.FC = () => {
const [count, setCount] = useState(0);
return (
<>
<div>
<p>{count}</p>
<button onClick={() => setCount(count + 1)}>Count</button>
</div>
<div>
<Example count={count}></Example>
</div>
</>
);
};
then the console.log
will print on each render of App
or each render of Example
which would occur when the state changes.
To turn our side effect into useEffect
, we simply wrap:
1
2
3
useEffect(() => {
console.log("", { count, localCount });
});
Our component then becomes:
1
2
3
4
5
6
7
8
9
10
11
12
13
14
const Example: React.FC<{ count: number }> = ({ count }) => {
const [localCount, setLocalCount] = useState(0);
useEffect(() => {
console.log("", { count, localCount });
}]);
return (
<div>
<p>{localCount}</p>
<button onClick={() => setLocalCount(localCount + 1)}>Local count</button>
</div>
);
};
The function given to useEffect
is called at each update, this is how count
and localCount
can have the correct value.
When we click on the buttons, we can see in the logs that the console.log
get printed with the right value on each click:
1
2
3
4
5
6
{count: 0, localCount: 0}
{count: 1, localCount: 0}
{count: 2, localCount: 0}
{count: 3, localCount: 0}
{count: 3, localCount: 1}
{count: 3, localCount: 2}
With effect, we can also provide a function as return so that we can execute teardown functionalities:
1
2
3
4
5
6
7
useEffect(() => {
console.log("", { count, localCount });
return () => {
console.log("teardown", { count, localCount });
};
});
then before the effect is executed, the previous instance will be teardowned.
It may be too excessive to execute the effect on each render as when the parent gets rendered, it also trigger a render on the component, or when props update or state updates, it will trigger a render.
If we want to control the execution of useEffect
we can provide a second argument array to state the dependencies of the effect and when it should be executed.
For example our effect depends on count
and localCount
so we can provide the following:
1
2
3
4
5
6
7
useEffect(() => {
console.log("", { count, localCount });
return () => {
console.log("teardown", { count, localCount });
};
}, [count, localCount]);
With this, the effect will run only when count
or localCount
are updated. We can verify the behavior as if we only use [localCount]
, on changes of count
, the effect will not be called.
On first render, the effect is ran once, so if we want to run only once, we can provide an empty array []
:
1
2
3
4
5
6
7
useEffect(() => {
console.log("", { count, localCount });
return () => {
console.log("teardown", { count, localCount });
};
}, []);
With this setup, the effect will run only once and never again. And if we don’t provide the second argument, the behavior is as described in the first section which is that the effect is ran on each update.
Lastly a special variant of useState
and useEffect
, if our effect depends on a state that the effect itself modifies, we would be entering an infinite loop where the state update triggers the effect; and the effect changes the state.
For example the following interval set in useEffect
:
1
2
3
4
5
useEffect(() => {
const interval = setInterval(() => setLocalCount((count + 1), 1000);
return () => clearInterval(interval);
}, []);
This will always return 1
because count
will always remain 0
as the effect is ran only once with count = 0
. So every time the interval triggers, count
will be 0
.
But the problem is that if we add [count]
as dependency of the effect, then it will enter a loop where the interval will be teardown and recreated every time the interval kicks in.
The solution for that is the functional update form of setLocalCount
:
1
2
3
4
5
useEffect(() => {
const interval = setInterval(() => setLocalCount((c) => c + 1), 1000);
return () => clearInterval(interval);
}, []);
That way, the state update is based on a previous state provided inside the function and we don’t reference external values.
And that concludes today’s post!
Today we looked at useEffect
hook and the different way of using it. We started by looking at when we should be using the hook and we then moved on to how to remove excessive without falling into any pitfall. I hope you liked this post and I’ll see you on the next one!