Nginx Debugging With Mitmproxy

In previous blog posts, we saw how to proxy requests to an ASP NET Core application using Nginx. We saw that request headers also can be proxied with proxy_set_header In order to ease development, we need to be able to debug the values to verify that they are what we expect.
Today we will see two methods to inspect the proxied requests.
Nginx Location Routing
Considering the following configuration of our server:
1
2
3
4
5
6
7
8
9
10
11
server {
    listen 80;

    location / {
        proxy_pass http://localhost:5000;
    }

    location /api/ {
        proxy_pass http://localhost:5001/;
    }
}
If we want to check whether our location routes are properly configured, we can short circuit the proxy_pass with return and use curl to check whether the location is properly selected.
1
2
3
4
5
6
7
8
9
10
11
12
13
server {
    listen 80;

    location / {
        return 200 "location '/'";
        proxy_pass http://localhost:5000;
    }

    location /api/ {
        return 200 "location '/api/'";
        proxy_pass http://localhost:5001/;
    }
}
When we use curl, we can check wheter our locations are hit as expected.
1
2
3
4
5
> curl http://localhost/test
location '/'

> curl http://localhost/api/test
location '/api/'
Nginx Variable Debugging
http://nginx.org/en/docs/varindex.html
Nginx also provides a set of variable which can be found in the documentation. Some of the common ones are $host, $request_uri or $scheme.
To check the values of those variables at runtime, we can use the same return method as in 1) by adding the token in the text.
1
2
3
location / {
    return 200 "location '/' $scheme $host $request_uri $uri";
}
Then using curl:
1
2
> curl localhost/test
location '/' http localhost /test /test
Nginx Proxied Request Debug with Mitmproxy
Proxy browser requests
Mitmproxy is command line proxy which can be used to inspect traffic coming in and out of it. In the previous parts, we saw how to debug the location routing and how to display the variables from Nginx. In this last part we will see how we can intercept the requests proxied by Nginx to our underlying process like Kestrel for ASPNET Core.
To do that we start by downloading the binaries from the release notes of Mitmproxy on Github and extract it.
1
2
> wget https://github.com/mitmproxy/mitmproxy/releases/download/v4.0.1/mitmproxy-4.0.1-linux.tar.gz
> tar -xvzf mitmproxy-4.0.1-linux.tar.gz
This will yield 3 binaries mitmproxy, mitmdump and mitmweb. Here we are interested in mitmproxy which is the CLI proxy. Once it is extracted, make sure to set it as executable and execut it:
1
./mitmproxy
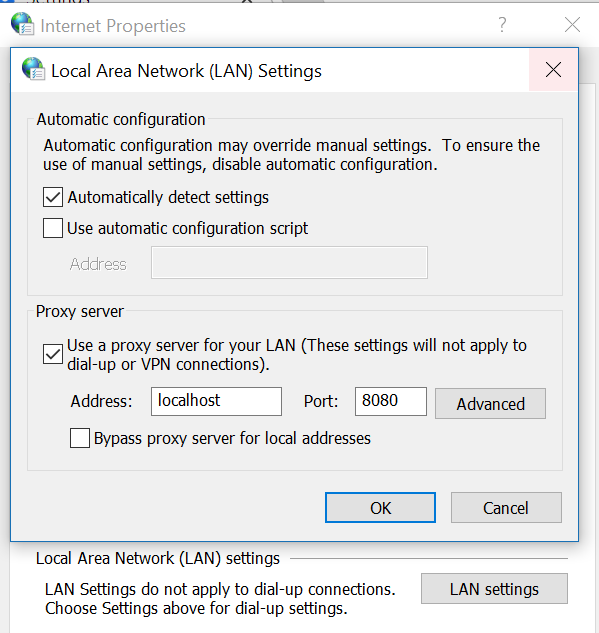
This will start mitmproxy. If we host an application on http://localhost:5000 and wish to proxy request from the browser, we can set it up in the proxy settings in Chrome.
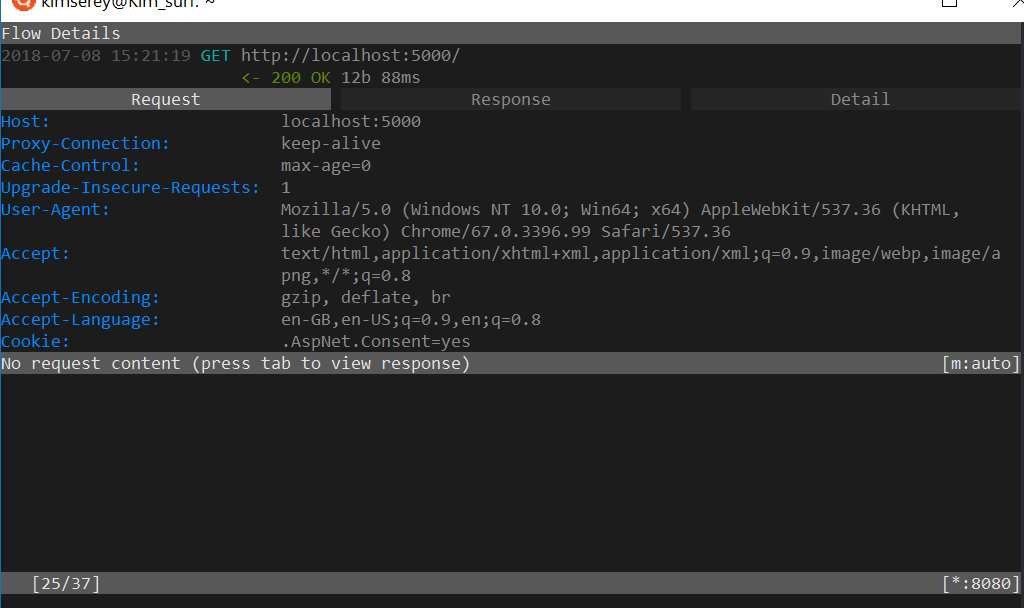
When we navigate to http://localhost:5000, the call will be proxied through mitmproxy and will be displayed on the CLI.
If our underlying host is serving on HTTPS with a self signed SSL certificate, common in develoment, we will hit the following error:
502 Bad Gateway Certificate verification error for localhost: self signed certificate (errno: 18, depth: 0)
This is due to the upstream certificate not being trusted.
To fix that, we can add ssl_verify_upstream_trusted_ca: [path] to the options of mitmproxy. The options are specified in the .mitmproxy/config.yaml file. The options list is available on the official documentation.
Add the option with the physical path of the certificate.
1
ssl_verify_upstream_trusted_ca: /etc/ssl/certs/ca-certificates.crt
Here we gave the path of the locally trusted root certificates.
Proxy Nginx requests
So far we have seen how to proxy through mitmproxy but what we are more interested in for this post is how to proxy through mitmproxy from Nginx to Kestrel rather than from Browser to Nginx. In order to do so, we need to place mitmproxy between Nginx and Kestrel by setting it up as a reverse proxy.
This can be achieved using the mode: reverse:[host] option. We change our config.yaml to include the reverse proxy mode.
1
2
ssl_verify_upstream_trusted_ca: /mnt/c/ssl/localhost.crt
mode: reverse:https://localhost:5001
As we can see, we specify that what traffic comes into mitmproxy will be proxied to https://localhost:5001. And lastly we configure the location proxy_pass on Nginx configuration to proxy to mitmproxy:
1
2
3
location / {
    proxy_pass https://localhost:8080;
}
From there we should now be able to inspect the content of the request proxied by Nginx to Kestrel.
For example here is a full Nginx configuration with a self signed SSL certificate:
1
2
3
4
5
6
7
8
9
10
11
12
13
14
15
16
server {
    listen 80

    proxy_http_version 1.1;
    proxy_set_header Connection keep-alive;
    proxy_set_header Upgrade $http_upgrade;
    proxy_cache_bypass $http_upgrade;

    location / {
            include /etc/nginx/proxy_params;

            proxy_set_header X-Hello-World HelloWorld;

            proxy_pass https://localhost:5001;
    }
}
Note that we have added a test proxy_set_header X-Hello-World, to be able to see whether the header is properly set, we start mitmproxy and change the proxy_pass:
1
2
# proxy_pass https://localhost:5001;
proxy_pass https://localhost:8080;
And we should now see the header coming out in mitmproxy:

And that conclude today’s post!
Conclusion
Today we saw multiple ways to debug requests coming from Browsers or proxied from Nginx. We started by looking at how to debug location routing, verifying whether paths matched what we expected. Then we moved on to see how we could debug Nginx variables and see what there contents were. Lastly we looked into mitmproxy, a powerful CLI proxy which can be used to debug calls from Browsers to servers and debug calls proxied from Nginx to Kestrel which will allow us to see if the necessary headers and content are proxied as we expect them to be. Hope you like this post, see you next time!


