Custom Blue Green Deployment With Nginx And Gitlab Ci


Blue-green deployment is a method used to reduce risk and downtime during deployment. Today we will see how we can implement a fully custom Blue-green deployment for a single server setup using Nginx and using Gitlab CI for continuous deployment.
Blue-green Deployment
Blue-green deployment is a method used to reduce risk and downtime during deployment.
- Risk is mitigated by deploying in a
stagingenvironment enabling us to run safecheck from production directly, - Downtime is mitigated as deployment occurs on
staging,liveenvironment is untouched while deployment is occuring and traffic is unaffected.
When we want to release, we then swap the environments, staging becomes live and vice versa. If any issue surfaces, we can act quickly by swapping back and we are back to the original live environment prior deployment.
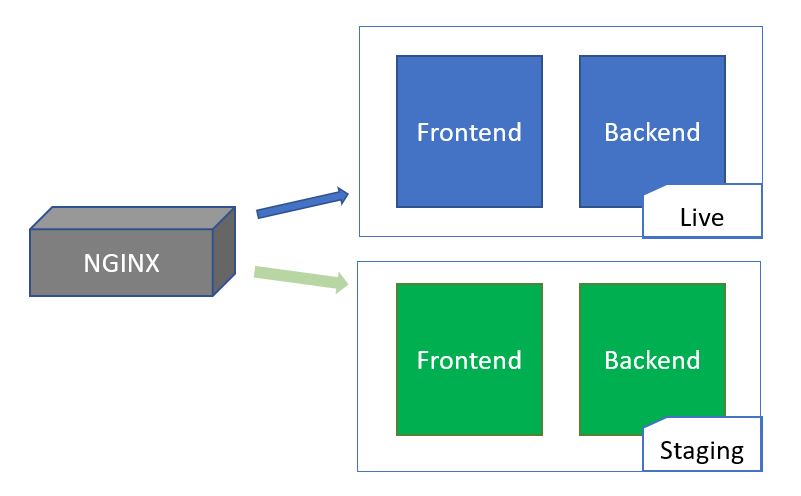
As we can see, we have four important environments, blue, green, staging and live:
blueandgreenare always running in production,stagingis the environment used for testing in production and for deployment,liveis the live enviromment being used by real customers,
At any point in time, blue or green can become the live or staging environment.
We also define that:
bluefrontend will be hosted on port50000and backend on5000,greenfrontend will be hosted on port51000and backend on5100.
The application that we will be deploying is a static HTML frontend with an ASP NET Core backend.
Nginx
Nginx comes with the concept of sites-available and sites-enabled. sites-enabled are simply symlinks pointing to configurations from sites-available.
Using the upstream directive and proxy module, we can produce the Blue-green setup effect where we:
- Proxy all routes to the
upstreamservers, - Setup two
upstreamconfigurations one whereblueislive(andgreenisstaging) and another for the opposite.
When we need to swap traffic, we overwrite the current upstream symlink with symlink containing the opposite upstream. Let’s see how this can be done.
In the following example, I am using my domain called notkimsereylam.xyz.
Proxy all calls
We start by creating two Nginx configurations, one for the live system /etc/nginx/sites-available/live:
1
2
3
4
5
6
7
8
9
10
11
12
13
14
15
16
17
18
server {
	listen	80 default_server;
	listen	[::]:80 default_server;
	server_name notkimsereylam.xyz www.notkimsereylam.xyz;

	root /var/www/html;
	index index.html;

	include snippets/proxy.conf;

	location /api {
		proxy_pass http://backend;
	}

	location / {
		proxy_pass http://frontend;
	}
}
And one for the staging system /etc/nginx/sites-available/staging:
1
2
3
4
5
6
7
8
9
10
11
12
13
14
15
server {
  listen	80;
	listen	[::]:80;
  server_name staging.notkimsereylam.xyz;

	include snippets/proxy.conf;

	location /api {
		proxy_pass http://backend_staging;
	}

	location / {
		proxy_pass http://frontend_staging;
	}
}
As we can see, /api is proxied to backend and backend_staging while / is proxied to frontend and frontend_staging. We then enable both by creating the symlinks:
1
2
sudo ln -s /etc/nginx/sites-available/live /etc/nginx/sites-enabled/live
sudo ln -s /etc/nginx/sites-available/staging /etc/nginx/sites-enabled/staging
Setup upstreams
We then create the first upstream configuration where blue is live, we call this configuration blue, /etc/nginx/sites-available/blue:
1
2
3
4
5
6
7
8
9
10
11
12
13
14
15
upstream backend {
	server localhost:5000;
}

upstream frontend {
	server localhost:50000;
}

upstream backend_staging {
	server localhost:5100;
}

upstream frontend_staging {
	server localhost:51000;
}
And similarly for green, /etc/nginx/sites-available/green:
1
2
3
4
5
6
7
8
9
10
11
12
13
14
15
upstream backend {
	server localhost:5100;
}

upstream frontend {
	server localhost:51000;
}

upstream backend_staging {
	server localhost:5000;
}

upstream frontend_staging {
	server localhost:50000;
}
In this case we only want one upstream symlink so we create a single symlink:
1
sudo ln -sf /etc/nginx/sites-available/blue /etc/nginx/sites-enabled/upstreams
Frontends
Lastly as the frontend files are static files, we use Nginx to host the static files and create two frontend:
1
2
3
4
5
6
7
8
9
10
11
12
13
14
15
16
17
18
19
20
21
22
23
24
25
26
27
28
29
30
31
32
33
34
35
36
server {
	listen	50000;
	listen	[::]:50000;

	server_name _;

	root /var/www/blue/frontend;
	index index.html;

	location /deployment_id {
		return 200 "blue";
	}

	location / {
		try_files $uri $uri/ =404;
	}
}

server {
	listen	51000;
	listen	[::]:51000;

	server_name _;

	root /var/www/green/frontend;

	index index.html;

	location /deployment_id {
		return 200 "green";
	}

	location / {
		try_files $uri $uri/ =404;
	}
}
The blue frontend has as root /var/www/blue/frontend while green has as root /var/www/green/frontend.
We then endup with the following configurations in sites-enabled:
1
2
3
4
frontend -> /etc/nginx/sites-available/frontend
live -> /etc/nginx/sites-available/live
staging -> /etc/nginx/sites-available/staging
upstreams -> /etc/nginx/sites-available/blue
Swapping can now be done by simply overwriting upstreams with either blue or green.
sudo ln -sf /etc/nginx/sites-available/green /etc/nginx/sites-enabled/upstreams will set green as the live system while sudo ln -sf /etc/nginx/sites-available/blue /etc/nginx/sites-enabled/upstreams will set blue as the live system. All we need is to reload nginx with sudo systemctl reload nginx.
Systemd
For the ASP NET Core backend, we prepare two Systemd units, one for blue and another one for green. We first copy the published .NET dlls under /var/www/blue/backend and /var/www/green/backend and make sure dotnet runtime is available.
Then we create the unit for /etc/systemd/system/backend-blue.service:
1
2
3
4
5
6
7
8
9
10
11
12
[Unit]
Description=Backend Blue

[Service]
WorkingDirectory=/var/www/blue/backend/
ExecStart=/usr/bin/dotnet Backend.dll
SyslogIdentifier=backend-blue
Environment=ASPNETCORE_URLS=http://localhost:5000
User=www-data

[Install]
WantedBy=multi-user.target
And then the unit for /etc/systemd/system/backend-green.service:
1
2
3
4
5
6
7
8
9
10
11
12
[Unit]
Description=Backend Green

[Service]
WorkingDirectory=/var/www/green/backend/
ExecStart=/usr/bin/dotnet Backend.dll
SyslogIdentifier=backend-green
Environment=ASPNETCORE_URLS=http://localhost:5100
User=www-data

[Install]
WantedBy=multi-user.target
We then enable both and start both:
1
2
3
4
sudo systemctl enable backend-blue
sudo systemctl start backend-blue
sudo systemctl enable backend-green
sudo systemctl start backend-green
The unit setup the application to run on post 5000 for blue and port 5100 for green as we decided earlier. We now have two complete running environments frontend + backend which are accessible either from live on https://notkimsereylam.xyz or staging on https://notkimsereylam.xyz. We can swap environments at will by changing the symlink and reloading nginx.
The last step is to figure how to automate the deployment and always deploy onto staging while enabling manual swap. We will do this next with GitlabCI.
Gitlab CI
We start first by defining our stages in a .gitlab-ci.yml configuration:
1
2
3
4
stages:
  - package
  - deploy
  - swap
We define three stages, the first one will be to package both frontend and backend, the second one to deploy from our CI server to our production server and the last one will be to swap staging and live.
Package
Next we define the job to package our backend. For that we will use the microsoft/dotnet:2.2-sdk-alpine image which is basically alipine with dotnet SDK. We start first by installing zip and we then publish with dotnet publish and zip the resulting output. We then specify that the artifact to be pass down to the next stage is the backend.zip.
1
2
3
4
5
6
7
8
9
10
11
12
13
14
package_backend:
  stage: package
  image: microsoft/dotnet:2.2-sdk-alpine
  script:
    - apk add --update zip
    - dotnet publish $CI_PROJECT_DIR/src/backend/Backend.csproj -o $CI_PROJECT_DIR/dist
    - cd dist
    - zip backend.zip ./*
  artifacts:
    name: backend
    paths:
      - dist/backend.zip
  tags:
    - docker
Similarly we package the frontend which is simply a copy of the static HTML files:
1
2
3
4
5
6
7
8
9
10
11
12
13
14
15
package_frontend:
  stage: package
  image: alpine:latest
  script:
    - apk add --update zip
    - mkdir dist
    - mv src/frontend/* dist
    - cd dist
    - zip frontend.zip ./*
  artifacts:
    name: frontend
    paths:
      - dist/frontend.zip
  tags:
    - docker
For the two previous stages, we target shared runners from Gitlab whih have docker installed.
Deploy
For deployment stage, we use our own CI server with a Gitlab runner installed.
We can define our own CI Server by installing gitlab-runner on an ubuntu server and registering a runner by following the CLI wizard.
From Nginx Frontends configuration, we can see that we have defined a special path called /deployment_id. This path is used to identify the current environment used in live and staging. This is useful for debugging and it will be used here to decide which environment to overwrite as https://staging.notkimsereylam.xyz/deployment_id will tell us which environment is currently the staging environment.
Provided that we have setup ssh to allow connection to our production server, here my server is called notkl (notkimsereylam), the script to deploy the frontend then becomes simply:
1
2
3
4
5
6
7
8
9
DEPLOYMENT_ENV=$(curl -s https://staging.notkimsereylam.xyz/deployment_id)
cd dist

# Deploy frontend to staging
scp -qr ./frontend.zip notkl:~
ssh notkl "unzip -o ~/frontend.zip -d ~/frontend"
ssh notkl "sudo rm -rf /var/www/$DEPLOYMENT_ENV/frontend/*"
ssh notkl "sudo mv ~/frontend/* /var/www/$DEPLOYMENT_ENV/frontend"
ssh notkl "rm -rf ~/frontend*"
In order, the scripts does the following:
- figures which is the current staging environment with
DEPLOYMENT_ENV=$(curl -s https://staging.notkimsereylam.xyz/deployment_id), - navigate to the
/distwhich contains the artifactsfrontend.zipandbackend.zipdownloaded automatically from previous stages, - copy the zip with
scpto the production server, unzipthe artifact and replace the whole content of the frontend folder in production/var/www/$DEPLOYMENT_ENV/frontendwhere$DEPLOYMENT_ENVis eitherblueorgreen,- clean up the CI server.
For the backend, we only need to add the step to restart Systemd as the backend is Kestrel managed by Systemd.
The whole deploy stage then becomes:
1
2
3
4
5
6
7
8
9
10
11
12
13
14
15
16
17
18
19
20
21
22
23
24
25
26
27
28
deploy:
  stage: deploy
  script:
    - DEPLOYMENT_ENV=$(curl -s https://staging.notkimsereylam.xyz/deployment_id)
    - cd dist

    # Deploy frontend to staging
    - scp -qr ./frontend.zip notkl:~
    - ssh notkl "unzip -o ~/frontend.zip -d ~/frontend"
    - ssh notkl "sudo rm -rf /var/www/$DEPLOYMENT_ENV/frontend/*"
    - ssh notkl "sudo mv ~/frontend/* /var/www/$DEPLOYMENT_ENV/frontend"
    - ssh notkl "rm -rf ~/frontend*"

    # Deploy backend to staging
    - scp -qr ./backend.zip notkl:~
    - ssh notkl "unzip -o ~/backend.zip -d ~/backend"
    - ssh notkl "sudo rm -rf /var/www/$DEPLOYMENT_ENV/backend/*"
    - ssh notkl "sudo mv ~/backend/* /var/www/$DEPLOYMENT_ENV/backend"
    - ssh notkl "rm -rf ~/backend*"
    - ssh notkl "sudo systemctl restart backend-$DEPLOYMENT_ENV"

  variables:
    GIT_STRATEGY: none
  environment:
    name: staging
    url: https://staging.notkimsereylam.xyz
  tags:
    - blue-green
Swap
And lastly we implement a swap job which will swap environments between live and staging by replacing the previous upstreams symlink with the new one and reloading Nginx. This stage is set to be manual with when: manual. We also specify that it has no dependencies with dependencies: [] so that the artifacts wouldn’t get downloaded as they are no longer needed.
1
2
3
4
5
6
7
8
9
10
11
12
13
14
15
swap:
  stage: swap
  script:
    - DEPLOYMENT_ENV=$(curl -s https://staging.notkimsereylam.xyz/deployment_id)
    - ssh notkl "sudo ln -sf /etc/nginx/sites-available/$DEPLOYMENT_ENV /etc/nginx/sites-enabled/upstreams"
    - ssh notkl "sudo systemctl reload nginx"
  dependencies: []
  variables:
    GIT_STRATEGY: none
  when: manual
  environment:
    name: live
    url: https://notkimsereylam.xyz
  tags:
    - blue-green
Complete GitlaCI Yaml
And here is the complete yaml file:
1
2
3
4
5
6
7
8
9
10
11
12
13
14
15
16
17
18
19
20
21
22
23
24
25
26
27
28
29
30
31
32
33
34
35
36
37
38
39
40
41
42
43
44
45
46
47
48
49
50
51
52
53
54
55
56
57
58
59
60
61
62
63
64
65
66
67
68
69
70
71
72
73
74
75
76
77
78
79
80
stages:
  - package
  - deploy
	- swap

package_backend:
  stage: package
  image: microsoft/dotnet:2.2-sdk-alpine
  script:
    - apk add --update zip
    - dotnet publish $CI_PROJECT_DIR/src/backend/Backend.csproj -o $CI_PROJECT_DIR/dist
    - cd dist
    - zip backend.zip ./*
  artifacts:
    name: backend
    paths:
      - dist/backend.zip
  tags:
    - docker

package_frontend:
  stage: package
  image: alpine:latest
  script:
    - apk add --update zip
    - mkdir dist
    - mv src/frontend/* dist
    - cd dist
    - zip frontend.zip ./*
  artifacts:
    name: frontend
    paths:
      - dist/frontend.zip
  tags:
    - docker

deploy:
  stage: deploy
  script:
    - DEPLOYMENT_ENV=$(curl -s https://staging.notkimsereylam.xyz/deployment_id)
    - cd dist

    # Deploy frontend to staging
    - scp -qr ./frontend.zip notkl:~
    - ssh notkl "unzip -o ~/frontend.zip -d ~/frontend"
    - ssh notkl "sudo rm -rf /var/www/$DEPLOYMENT_ENV/frontend/*"
    - ssh notkl "sudo mv ~/frontend/* /var/www/$DEPLOYMENT_ENV/frontend"
    - ssh notkl "rm -rf ~/frontend*"

    # Deploy backend to staging
    - scp -qr ./backend.zip notkl:~
    - ssh notkl "unzip -o ~/backend.zip -d ~/backend"
    - ssh notkl "sudo rm -rf /var/www/$DEPLOYMENT_ENV/backend/*"
    - ssh notkl "sudo mv ~/backend/* /var/www/$DEPLOYMENT_ENV/backend"
    - ssh notkl "rm -rf ~/backend*"
    - ssh notkl "sudo systemctl restart backend-$DEPLOYMENT_ENV"

  variables:
    GIT_STRATEGY: none
  environment:
    name: staging
    url: https://staging.notkimsereylam.xyz
  tags:
    - blue-green

swap:
  stage: swap
  script:
    - DEPLOYMENT_ENV=$(curl -s https://staging.notkimsereylam.xyz/deployment_id)
    - ssh notkl "sudo ln -sf /etc/nginx/sites-available/$DEPLOYMENT_ENV /etc/nginx/sites-enabled/upstreams"
    - ssh notkl "sudo systemctl reload nginx"
  dependencies: []
  variables:
    GIT_STRATEGY: none
  when: manual
  environment:
    name: live
    url: https://notkimsereylam.xyz
  tags:
    - blue-green
And we endup with a complete Blue-green deployment setup with automated deployment!
Conclusion
Today we saw how to get a Blue-green deployment setup using only Nginx and GitlabCI. We started by defining the different configurations necessary to enable two environments to be available on production server and we saw how to swap from live to staging using symlinks. We then moved on to setup GitlabCI to get a fully automated deployment which will deploy to the staging and allowing to swap staging with live if we need to promote it. Hope you liked this post, see you on the next one!


