Gitlab Pipeline Artifacts And Environments

Almost a year ago I wrote about how we could setup CI/CD with gitlab pipeline. I showed a very simple 3 stages pipeline build/test/deploy. Since then Gitlab has improved considerably their CI tool with features simplifying releases management. Today we will revisit pipelines and introduce few concepts which will help in managing releases.
Pipeline
Pipeline are defines as jobs. Each job can be part of a stage in the pipeline and multiple jobs can run concurrently if part of the same stage.
The pipeline is define in a .gitlab-ci.yml file placed at the root of the application.
We can setup our own runner or use a shared runner from Gitlab. The shared runner runs on Docker therefore it’s possible to build the dotnet image and build our dotnet application.
Here is the pipeline we will be using as example pipeline:
1
2
3
4
5
6
7
8
9
10
11
12
13
14
15
16
17
18
19
20
21
22
23
24
25
26
27
28
29
30
31
32
33
34
35
image : microsoft/dotnet:latest

stages:
  - build
  - test
  - package
  - deploy

build:
  stage: build
  script:
    - dotnet build MyApp -c Release
  only:
    - master

test:
  stage: test
  script:
    - dotnet test MyApp -c Release
  only:
    - master

package:
  stage: package
  script:
    - dotnet publish MyApp -c Release
  only:
    - master

deploy:
  stage: deploy
  script:
    - echo "Deploy to production"
  only:
    - master
We can see that we have four stages build, test, package and deploy.
In this pipeline, any commit on master triggers a build and flows till deployment which works fine depending on the commit flow and branching mechanism used but if we have a large amount of commit on master, it isn’t ideal due to the fact that we would be constantly deploying. Another issue is that we are not considering versioning and we can only trace deployment by hash commit.
If you need more information, I have written deeper explanations on my previous blog posts 1 and 2.
Releases
As we saw in 1) the downside of having a simple pipeline releasing at each commit is that we would be constantly be flooding our environment with new releases.
To address that we can set a manual trigger.
1
2
3
4
5
6
7
deploy:
  stage: deploy
  script:
    - echo "Deploy to production"
  when: manual
  only:
    - master
Now when we deploy, our pipeline will stop and a manual action will be required:
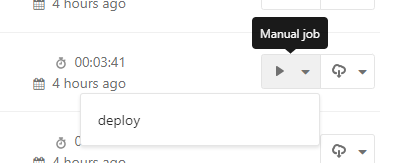
With this step we can manage what is released. The next issue we identified is the version. Understanding releases by looking at the commit hash is hard. Talking to other colleagues about commit hash is even harder. To counter that we use versions.
If you are not familiar with semantic versioning, I have talked extensively about it in my previous blog post.
The simplest way is to apply the versioning ourselves throught tags. Meaning if we want to release version
1.0.0 (commit abc), we would tag abc with 1.0.0. Following semantix versioning, the next version to tag will be 1.0.1 or 1.1.0 or 2.0.0 depending on what we release.
We also want to only trigger packaging and deployment for tagged commits only. We can achieve that by changing only: - master to only: - tags
1
2
3
4
5
6
7
8
9
10
11
12
13
14
15
16
17
18
19
20
21
22
23
build:
  stage: build
  script:
    - dotnet build MyApp -c Release

test:
  stage: test
  script:
    - dotnet test MyApp -c Release

package:
  stage: package
  script:
    - dotnet publish MyApp -c Release
  only:
    - tags

deploy:
  stage: deploy
  script:
    - echo "Deploy to production"
  only:
    - tags
With those changes on the pipeline, normal commits would trigger a pipeline of two stages build/test while tagged commits would trigger pipelines of four stages build/test/package/deploy and of course deployment would require a manual intervention (also called gated stage).
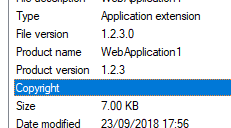
Lastly we can take the tag from the build with the variable $CI_COMMIT_TAG and use it when packaging our dotnet application so that our library is built with the version in it. This will be helpful to know in the future which version we are currently using.
1
2
3
4
5
6
package:
  stage: package
  script:
    - dotnet publish MyApp -c Release /p:Version=$CI_COMMIT_TAG
  only:
    - tags
If we looked at the property of the dll generated, we would see the version applied:
Artifacts
Our package stage generates libraries which are deployed to production environment. Those libraries all together form what is called an artifact. GitLab also support upload of artifacts by using the artifacts property:
1
2
3
4
5
6
7
8
9
10
11
12
package:
  stage: package
  script:
    - dotnet publish MyApp -c Release -o ../artifacts/MyApp /p:Version=$CI_COMMIT_TAG
    - "echo $CI_COMMIT_TAG-$CI_COMMIT_SHA >> artifacts/MyApp/version"
  artifacts:
    name: "myapp-$CI_COMMIT_TAG"
    paths:
      - artifacts/MyApp
    expire_in: 2 days
  only:
    - tags
Here we set the artifact name, path and expiry. We compose the name with our app name and the tag (which is the version). The path is the artifact path which we provide as the output of the dotnet publish command. And we set the expiry to be of a week.
The expiry should be set to match your delay before decision to release to environment. Meaning from the time your build your version, how long will it take for the person in charge to take the decision to click Deploy. In this example, I will be release straight away as soon as I know that the packaging succeeded therefore two days is fairly safe.
Even after expiry, it is always possible to rerun the job and deploy right after.
Once packaged, the artifact can be browsed or downloaded from the package job page:
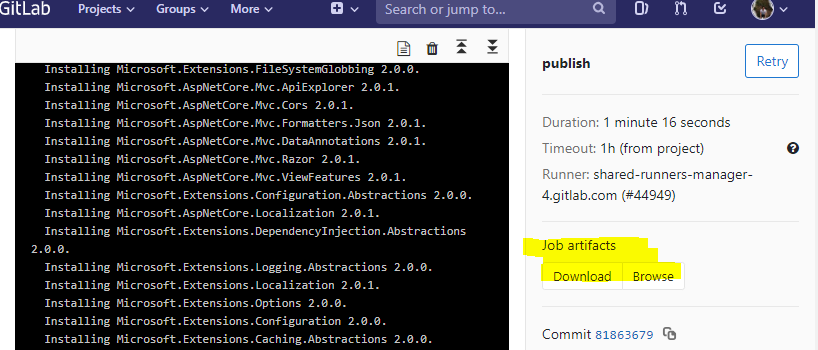
We now can inspect the content of the artifact before deployment or even after deployment. This can come handy to make sure that what is deployed is actually what we expect.
By default, all artifacts are available on the next stage. If we look at the logs of the package stage, we will see the following:
1
2
3
Uploading artifacts...
artifacts/MyApp: found 280 matching files
Uploading artifacts to coordinator... ok            id=100641327 responseStatus=201 Created token=...
And if we look at the log of the next deploy stage, we should find the counterpart message:
1
2
Downloading artifacts for publish (100641327)...
Downloading artifacts from coordinator... ok        id=100641328 responseStatus=200 OK token=...
This is particularly helpful as even if we redeploy in one day, two days, one month or even one year, this particular artifact will be downloaded and can be used to deploy the application at this particular state.
Environments
So far we saw how to build and store artifact and we saw how to version our releases and deployment. Once we have a certain number of releases, it becomes hard to keep track of what was last release to our environment for example production environment. Using the pipeline view is not designed to keep track of releases as each commit will trigger a new pipeline. And if we do need to rollback to earlier version, the lastest successful tagged build will no longer be the one deployed on our production environment. To cater for this, GitLab environments is meant handle those scenarios.
An environment can automatically be created if we define it in the job itself:
1
2
3
4
5
6
7
8
9
10
deploy:
  stage: deploy
  script:
    - cat artifacts/MyApp/version
    - echo "Deploy to staging"
  environment:
    name: production
  when: manual
  only:
    - tags
Environment can be accessed from Operations > Environments. Here we have created production, here we can see that the latest deployment was 2.0.1 and that it was a rollback as previously 2.0.2 was deployed.
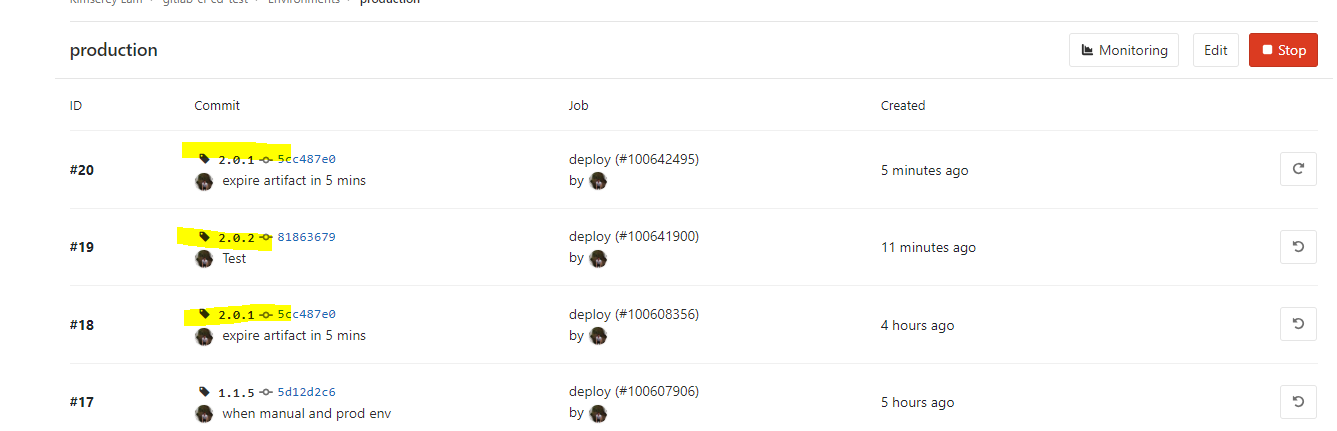
If we do encounter situation where we need to rollback, we can do so by pressing the right button. The ID represents the latest deployment which occurred on production.
And that concludes today’s post! Here is a complete Gitlab pipeline yaml file:
1
2
3
4
5
6
7
8
9
10
11
12
13
14
15
16
17
18
19
20
21
22
23
24
25
26
27
28
29
30
31
32
33
34
35
36
37
38
39
40
41
42
43
44
45
image : microsoft/dotnet:latest

stages:
  - build
  - test
  - package
  - deploy

build:
  stage: build
  script:
    - dotnet build MyApp -c Release
  only:
    - master

test:
  stage: test
  script:
    - dotnet test MyApp -c Release
  only:
    - master

package:
  stage: package
  script:
    - dotnet publish MyApp -c Release -o ../artifacts/MyApp /p:Version=$CI_COMMIT_TAG
    - "echo $CI_COMMIT_TAG-$CI_COMMIT_SHA >> artifacts/MyApp/version"
  artifacts:
    name: "myapp-$CI_COMMIT_TAG"
    paths:
      - artifacts/MyApp
    expire_in: 2 days
  only:
    - tags

deploy:
  stage: deploy
  script:
    - cat artifacts/MyApp/version
    - echo "Deploy to staging"
  environment:
    name: production
  when: manual
  only:
    - tags
Conclusion
Today we saw how to setup GitLab pipeline to create a pipeline which handles all important steps in continuous integration and deployment. We saw how to setup two jobs which build and test the application code at each commits, then we saw how we could use tagging to deploy versioned assemblies. We also saw how we could upload those assemblies as an artifact into GitLab and make it available for the next deploy stage. Lastly we saw how to manage deployment in environments and how we could rollback a certain version in the environments. Hope you like this post, see you next time!


