Package Websharper To Mobile App

With WebSharper, it is easy and quick to build Single Page Applications (SPA) in F#. If you followed my blog, you must have noticed that I regularly post about WebSharper functionalities.
Building a SPA using F# is one of the reason why I started to look into WebSharper. It is also the subject of one of the first blog post I wrote.
https://kimsereyblog.blogspot.co.uk/2015/08/single-page-app-with-websharper-uinext.html
Last week I covered how to build a cross platform mobile app with Xamarin.Forms and I showed how to deploy it to an Android VM.
https://kimsereyblog.blogspot.co.uk/2016/05/setup-your-environment-to-build-android.html
Today, I would like to show how to embed a SPA built with WebSharper in F# into a Xamarin.Forms WebView to quickly transform your web app into a mobile app.
This post is composed by three parts:
- Build a simple
SPA - Build a Xamarin.Forms WebView
- Embed your SPA in the Android app

1. Build a simple SPA
1.1 UI Element constructs
For this example, I built a simple SPA using WebSharper.UI.Next.
The css style of the web app is from Bootstrap.
I favour the approach of abstracting UI elements into types with static functions which served to configure the elements
In this sample, we can find Table, NavBar, Hyperlink and NavTabs type.
Hyperlink - https://github.com/Kimserey/WebView/blob/master/WebView.WebApp/Bootstrap.Hyperlink.fs
Table - https://github.com/Kimserey/WebView/blob/master/WebView.WebApp/Bootstrap.Table.fs
NavBar - https://github.com/Kimserey/WebView/blob/master/WebView.WebApp/Bootstrap.NavBar.fs
NavTabs - https://github.com/Kimserey/WebView/blob/master/WebView.WebApp/Bootstrap.NavTabs.fs
Using types to abstract UI elements construction is a powerful way to increase readability, reusability and provide type safety as we limit the a.
The code then become cleaner and easier to maintain. For example, here’s the definition of a Table:
1
2
3
4
5
6
7
8
9
10
11
let shopsTable() =
    Table.Empty
    |> Table.SetStyle [ TableStyle.Hover; TableStyle.Striped; TableStyle.Bordered ]
    |> Table.AddHeaders [ "#"; "Name"; "Location"; "Category" ]
    |> Table.AddRow (TableRow.Create [ text "1"; text "Waitrose"; text "London"; text "Supermarket" ]
                    |> TableRow.OnClick (fun () -> route.Value <- Shop "Waitrose"))
    |> Table.AddRow (TableRow.Create [ text "2"; text "Aldi"; text "London"; text "Supermarket" ]
                    |> TableRow.OnClick (fun () -> route.Value <- Shop "Aldi"))
    |> Table.AddRow (TableRow.Create [ text "3"; text "Currys"; text "London"; text "Electronic" ]
                    |> TableRow.OnClick (fun () -> route.Value <- Shop "Currys"))
    |> Table.Render
You don’t need to worry too much on the SPA, I will cover the way the UI elements are abstracted and the way they are constructed in a future blog post.
1.2 Route map router
Managing urls is done through a RouteMap.
It maps between the endpoint type of the SPA - Endpoint type in the sample - and your urls.
1
2
3
4
5
6
7
8
9
10
11
12
13
14
15
16
17
18
type Endpoint =
    | Shop of string
    | Expense of string
    | Listing

let main =

    let route =
        RouteMap.Create
            (function
                | Shop name    -> [ "shops"; name ]
                | Expense name -> [ "expenses"; name ]
                | Listing      -> [ "listing" ])
            (function
                | [ "shops"; name ]    -> Shop name
                | [ "expenses"; name ] -> Expense name
                | _                    -> Listing)
        |> RouteMap.Install
Installing the route map return a reactive variable - route in the sample.
Url routing is important as it will be required to navigate with the hardware back button. If the url is not properly changed, the user experience won’t be great as the back button will exit the app.
The full web app project is available here: https://github.com/Kimserey/WebView/tree/master/WebView.WebApp
Launching the index.html should be enough to run the whole SPA.
2. Build a Xamarin.Forms WebView
Now that we have a SPA, the next step is to build the WebView.
A WebView is like a web browser running inside a page of an app.
We define itin a portacle library (PCL) in F# and use it from an Android app defined in a C# project.
For more information you can refer to my last week blog post on how to setup your environment to build apps with Xamarin.Forms and deploy an Android emulator.
2.1 Xamarin.Forms WebView
In order to load our SPA, we need to set the source of the WebView.
Since we our loading an html page, we use HtmlWebViewSource.
In HtmlWebViewSource we need to set the Html member and the BaseUrl member where Html is the html to be loaded and Base Url represents the base url used to navigate on the page.
All the relative path will be constructed using the base url therefore it is important that all scripts and stylesheets be loaded with a relative path.
1
2
3
4
5
6
7
8
9
10
11
12
13
14
15
16
17
18
19
20
21
22
23
24
25
26
type IBaseUrl =
    abstract member Get: unit -> string

module Core =
    let baseUrl =
        DependencyService.Get<IBaseUrl>().Get()

    let html = """
        <!DOCTYPE html>
        <html lang="en">
        <head>
            <title>WebView.WebApp</title>
            <meta charset="utf-8" />
            <meta name="viewport" content="width=device-width, initial-scale=1.0" />
            <link href="css/bootstrap.min.css" type="text/css" rel="stylesheet">
            <script src="js/jquery-1.12.4.min.js" type="text/javascript"></script>
            <script src="js/bootstrap.min.js" type="text/javascript"></script>
        </head>
        <body>
            <div id="nav"></div>
            <div id="main" class="container-fluid"></div>
            <script type="text/javascript" src="Content/WebView.WebApp.min.js"></script>
        </body>
        </html>
    """
    let webView = new WebView(Source = new HtmlWebViewSource(Html = html, BaseUrl = baseUrl))
The way assets are handled is different for each platform. Therefore we need to use the DependencyService to get an instance of IBaseUrl.
IBaseUrl will be define in each platform specific project.
2.2 WebView back button support
Now that we have our WebView, we need to place it in a page.
While loading the view into a page, we can take the opportunity to override the OnBackButtonPressed function which is triggered when the hardware back button is pressed.
We can then instruct the WebView to go back in the browser history.
This is why implementing the router in WebSharper.UI.Next was important.
1
2
3
4
5
6
7
type WebViewPage() =
    inherit ContentPage(Content = Core.webView)

    override this.OnBackButtonPressed() =
        base.OnBackButtonPressed() |> ignore
        if Core.webView.CanGoBack then Core.webView.GoBack()
        true
Finally we place the page in a Xamarin.Forms application.
1
2
type App() =
    inherit Application(MainPage = new WebViewPage())
The full code of the WebView can be found here:
https://github.com/Kimserey/WebView/blob/master/WebView.Mobile/View.fs
3. Embed your SPA in the Android app
Now that we have our SPA and that we have a preconfigured WebView, we need to embed the content of the SPA into our Android project and provide an implementation of IBaseUrl to the DependencyService.
3.1 Embed all content into the Android project
If you closely look at the index.html all links are relative paths.
1
2
3
4
css/bootstrap.min.css
js/jquery-1.12.4.min.js
js/bootstrap.min.js
Content/WebView.WebApp.min.js
This ensure that all files are loaded locally.
I got the Bootstrap source files from their website http://getbootstrap.com/getting-started/#download
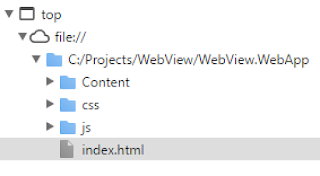
A good way to verify that all files are local is to open chrome debugger and check the Sources.
If everything is loaded locally, you should have a tree with a single base file://.
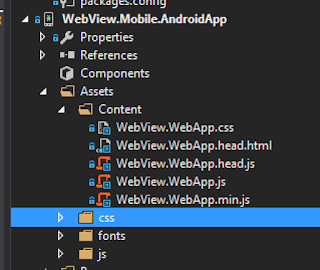
The next step is to take all the folders - \Content, \css, \js - and place it in the Asset folder of android.
Add the files as linked files using the option Add As Link.
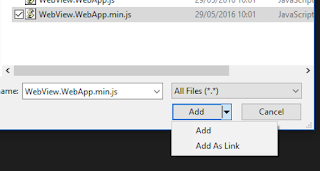
It will ensure that when deploying your Android app, it will always include the latest js files built.
You should now have all your files with the linked icon.
3.2 Implement IBaseUrl and launch the app
In our Xamarin.Forms project, we declared a IBaseUrl interface. Now it is time to give it an implementation specific to Android.
1
2
3
4
5
6
7
8
9
10
11
[assembly: Dependency(typeof(BaseUrl))]
namespace WebView.Mobile.AndroidApp
{
    public class BaseUrl : WebView.Mobile.IBaseUrl
    {
        public string Get()
        {
            return "file:///android_asset/";
        }
    }
}
All we need to do is return file:///android_asset/ which is the special path for the WebView to access embedded files.
Lastly we load the app from the Android main activity.
1
2
3
4
5
6
7
8
9
10
11
[Activity(Label = "WebView.Mobile.AndroidApp", MainLauncher = true, Icon = "@drawable/icon")]
public class MainActivity : Xamarin.Forms.Platform.Android.FormsApplicationActivity
{
    protected override void OnCreate(Bundle bundle)
    {
        base.OnCreate(bundle);

        Xamarin.Forms.Forms.Init(this, bundle);
        LoadApplication(new WebView.Mobile.App());
    }
}
Congratulation, you now deployed a WebSharper SPA to your Android emulator.
Conclusion
Today we saw how we could take a SPA built in WebSharper and embed it into an Android app.
If you just need a mobile app, going with WebSharper - or JS in general - would be overkill as you might as well just built your app with Xamarin.Forms.
But if you already have a SPA web app and need to quickly provide a mobile app, implementing a WebView is an approach to consider.
Anyway, I hope this gave you some ideas and I look forward to see the amazing things you will do with WebSharper and Xamarin.
If you have any comments leave it here or hit me on Twitter @Kimserey_Lam. See you next time!
The full source code is available on GitHub https://github.com/Kimserey/WebView.


