Setup Android Xamarin Forms Fsharp

May 19th, 2016 - written by Kimserey with .
Sometime setting up a development environment is enough to discourage developers to experiment certain platforms. Most of us (if not all of us) in .NET already heard of Xamarin. But to start working on Xamarin, you need to setup an Android VM and setup the IDE in order to deploy on the Android VM. And it gets worse if, like me, you run Windows on VMWare on OSX (and you want to code in F#). Few months back, Xamarin was kind of a no-no for indie development due to the pricing. But since it merged with Microsoft, it is now free!
It means development with Visual Studio does not require a business license anymore and we can now develop Xamarin.Forms libraries in F# easily!
Last week I started to explore Xamarin.Forms through Android. So before I forget how I setup the environment, I wanted to document it by sharing it with you in this post.
How to start building Android app with Xamarin.Forms when working on Windows booted from VMWare and deploy to Xamarin Android Player on OSX?
We will be following four steps to get everything working:
- Download Xamarin on Windows (and Visual Studio if you don’t have it)
- Download Xamarin Android Player on OSX
- Establish a connection between your Windows VM and the Xamarin Android Player
- Start working on your App
1. Download Xamarin on Windows (and Visual Studio if you don’t have it)
Xamarin on Windows: https://developer.xamarin.com/guides/android/getting_started/installation/windows/
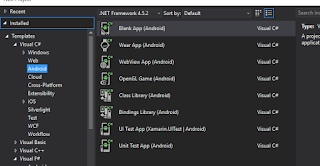
Xamarin already has a detailed installation process to get running on Windows. Go to the page, download the installer and follow the process. After that you should have the Visual Studio templates,

together with the Android panel.

Also you should have the SDKs downloaded already. If you want to make sure click on the Android SDK Manager icon.

2. Download Xamarin Android Player on OSX
Xamarin Android Emulator on OSX: https://developer.xamarin.com/guides/android/getting_started/installation/android-player/
Next get Xamarin Android Emulator on OSX. Nothing special, install it and launch it. It will launch the device manager which allows you to download different images with different versions of Android. Now that we have installed Xamarin on Windows and Xamarin Android Emulator on OSX, we need to establish the connection between both.
3. Establish a connection between your Windows VM and the Xamarin Android Player
Again Xamarin has done a great job in documenting this procedure: https://developer.xamarin.com/guides/android/deployment,_testing,_and_metrics/debug-on-emulator/xamarin-android-player/#Using_Xamarin_Android_Player_from_Visual_Studio_in_VMWare_or_Parallels
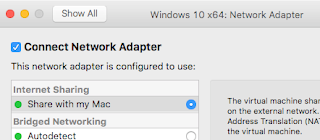
For me on VMWare, the only step needed is to configure the Network adapter (which is configure this way by default) as Share with my Mac

After that, get the IP address from the Android player by going to the settings. Open the Android adb command prompt from Visual Studio toolbar,

and connect Visual Studio to the Android player by typing:
1
adb connect x.x.x.x
Wonderful, you should now see your Android player name in the debug dropdown of Visual Studio.


You are now ready to start writing an app.
4. Start working on your App
Start a C# default Android project and deploy it to the Android player. It should work without any issue.
I am working with a C# Android project because the F# project template exhibits strange behaviours at the moment. It doesn’t allow me to change the target Android version and prompts error on the designer file such as “end is a special keyword”. But don’t worry, only the Android project is in C#, we will be using F# for Xamarin.Forms.
The Android project will serve as a bootup project from where you can deploy to the device. To add Xamarin.Forms, create a F# PCL (portable class library) and reference Xamarin.Forms from Nuget.

In the F# project, you can now create a Xamarin.Forms app.
Below is an example of what you could put to display a Hello world! label.
In the F# project, place the following code:
App.fs
1
2
3
4
5
6
namespace SimpleApp.Library

open Xamarin.Forms

type App() =
    inherit Application(MainPage = new ContentPage(Content = new Label(Text = "Hello world!")))
And place the following code in the main activity on the C# Android project:
MainActivity.cs
1
2
3
4
5
6
7
8
9
10
11
12
13
14
[Activity(Label = "SimpleApp.Android", MainLauncher = true, Icon = "@drawable/icon")]
public class MainActivity : Xamarin.Forms.Platform.Android.FormsApplicationActivity
{
    protected override void OnCreate(Bundle bundle)
    {
        base.OnCreate(bundle);

        // Initialise Xamarin.Forms
        Xamarin.Forms.Forms.Init(this, bundle);

        // Loads the app from the fs library
        LoadApplication(new SimpleApp.Library.App());
    }
}
And that’s it! If you run the Android project you should get the following:

The full source code can be found on Github. https://github.com/Kimserey/SimpleApp
Useful tips:
- Add
adbto path.bash_profilein order to have access toadb shellquicker1
export PATH=$PATH:/Users/kimsereylam/Development/android-sdk-macosx/platform-tools
- Use
logcatto display all the logs while debugging
Conclusion
Today we saw how we could easily setup an environment to start developing Android apps from Visual Studio on VMware and deploy the app to the Xamarin Android Player. By showing you that I hope that you will not get discouraged by the initial setup phase and most importantly, I hope that you will get started and code some amazing mobile apps! If you have any comments, leave it here or hit me on Twitter https://twitter.com/Kimserey_Lam. See you next time!