Swagger For Aspnetcore


Building a web API is not an easy task. In order to build one easy to use, we need to consider the routes, the HTTP methods, the return results from the endpoints, the parameter used for the body of the requests, etc… Swagger is a tool which compiles all our ApI endpoints into a user friendly UI and allows us to directly test our endpoints from the UI. Today we will see how we can integrate Swagger.
- Add Swagger to ASP NET Core project
- Handle authentication
- Handle endpoints specificities with filters
1. Add Swagger to ASP NET Core project
We start first by creating an empty ASP NET Core project with the following startup:
1
2
3
4
5
6
7
8
9
10
11
12
13
14
15
16
17
18
19
public class Startup
{
    public void ConfigureServices(IServiceCollection services)
    {
        services.AddMvc();
    }

    public void Configure(IApplicationBuilder app, IHostingEnvironment env, ILoggerFactory loggerFactory)
    {
        loggerFactory.AddConsole().AddDebug();

        if (env.IsDevelopment())
        {
            app.UseDeveloperExceptionPage();
        }

        app.UseMvcWithDefaultRoute();
    }
}
We can then add a controller with few endpoints. For example we can create a BankAccount controller with deposit and withdraw functionalities:
1
2
3
4
5
6
7
8
9
10
11
12
13
[Route("BankAccount")]
public class BankAccountController: Controller
{
    [HttpPost("{accountName}/Deposit")]
    public IActionResult Deposit(string accountName, [FromBody]double amount) => Ok();

    [HttpPost("{accountName}/Withdraw")]
    public IActionResult Withdraw(string accountName, [FromBody]double amount) => Ok();

    [HttpGet("{accountName}")]
    [ProducesResponseType(typeof(double), 200)]
    public IActionResult Get(string accountName) => Ok(balance);
}
Next in order to add Swagger, we need to add Swashbuckle.AspNetCore.
1
Install-Package Swashbuckle.AspNetCore
This will install the necessary libraries to use Swagger.
Then we register it on the services using the extension method AddSwaggerGen():
1
2
3
4
5
6
7
8
public void ConfigureServices(IServiceCollection services)
{
    services.AddMvc();
    services.AddSwaggerGen(c =>
    {
        c.SwaggerDoc("api-v1", new Info { Title = "Example API", Version = "v1" });
    });
}
The swagger document registration will autogenerate the swagger.json and make it available at /swagger/{name}/swagger.json.
Lastly we register both middlewares, the one creating the swagger.json and the one making the GUI available:
1
2
3
4
5
app.UseSwagger();
app.UseSwaggerUI(c =>
{
    c.SwaggerEndpoint("/swagger/api-v1/swagger.json", "Example API v1");
});
Once our application is started, we will be able access Swagger GUI endpoint /swagger and we will see our endpoints listed.
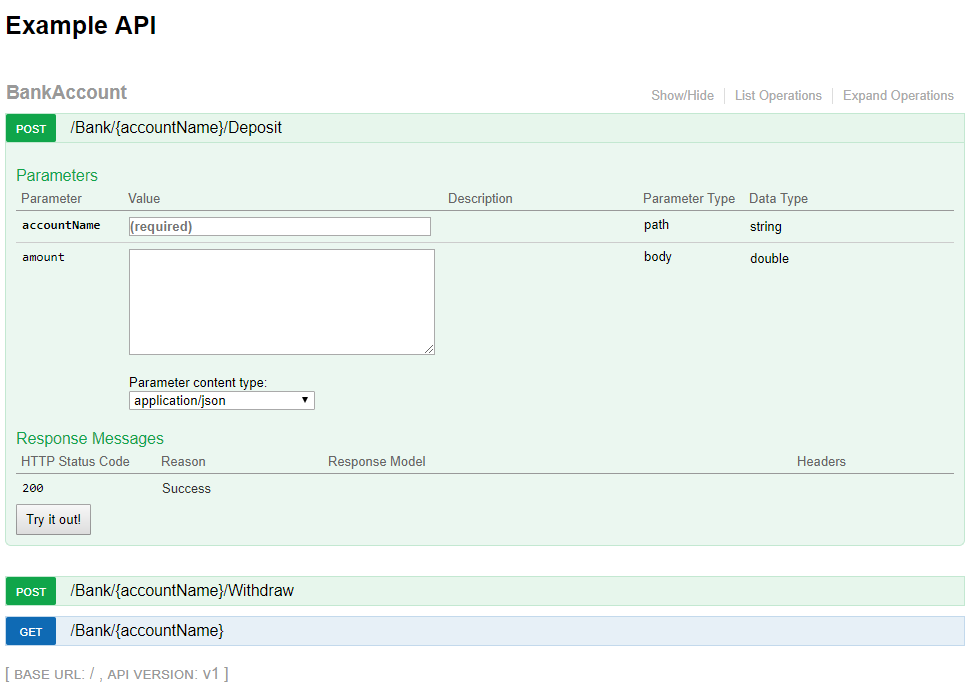
From there we can easily view all our endpoints and see if changes must be made. We can also directly test from here. Lastly our parameters are discovered together with their class schema which are displayed as example. This allows us to quickly iterate over the design of our API. So far, we have only seen how to access unprotected endpoints. The next step is to configure Swagger to add authentication.
2. Handle authentication
In order to authenticate the calls, we need to be able to add the authentication header to the requests.
This can simply be done by adding the security definition in the swagger gen service registration:
1
2
3
4
5
6
7
8
9
10
services.AddSwaggerGen(c =>
{
    c.AddSecurityDefinition("Bearer", new ApiKeyScheme
    {
        Name = "Authorization",
        In = "header"
    });

    c.SwaggerDoc("api-v1", new Info { Title = "Example API", Version = "v1" });
});
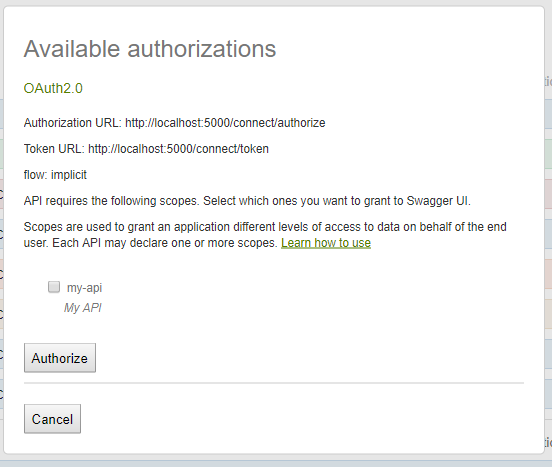
The ApiKeyScheme is meant to be used to authenticated calls from api to api using an API key. But we can use it as a quick hack to allow adding a bearer authorization for the whole API by specifying the header as Authorization and simply passing a Bearer token. After that from the top of the Swagger GUI, we will be able to click on Authorize and add the bearer token in the ApiKeyScheme configuration.
The problem with this is that we will need an external way to authenticate and get the token before we can input it inside Swagger.
How to authenticate from Swagger GUI with Identity server?
I am assuming that we already have Identity server preconfigured and running on implicit flow. If you are sure about Identity server, you can have a look at one of my previous blog post - Implicit flow with Identity Server.
Swagger has an implementation of the OAuth2 mechanism to authenticate using the OAuth2Scheme. In order to get it to work, we must configure the following:
- Configure the scheme in swagger gen
- Configure the swagger client GUI information such as clientId and clientSecret
- Register the swagger client as a client of our application on our Identity server
We start first by configuring the swagger gen:
1
2
3
4
5
6
7
c.AddSecurityDefinition("oauth2", new OAuth2Scheme
{
    AuthorizationUrl = "http://localhost:5000/connect/authorize",
    Flow = "implicit",
    TokenUrl = "http://localhost:5000/connect/token",
    Scopes = new Dictionary<string, string> { { "my-api-scope-in-identity", "A description of my API" } }
});
Next we configure the client information from the application builder using ConfigureOAuth2:
1
2
3
4
5
6
7
8
9
10
11
12
app.UseSwaggerUI(c =>
{
    c.ConfigureOAuth2(
        "swagger",  // the client id
        "swagger-secret",
        "swagger-realm",
        "Swagger");

    c.SwaggerEndpoint(
        "/swagger/api-v1/swagger.json",
        "API v1");
}
Lastly we need to register our Swagger client in Identity Server configuration:
1
2
3
4
5
6
7
8
9
10
11
12
13
14
15
new Client
{
    ClientId = "swagger", // the client id
    ClientName = "Swagger",
    ClientSecrets = { new Secret("swagger-secret") },
    AllowedGrantTypes = GrantTypes.Implicit,
    AllowAccessTokensViaBrowser = true,
    AllowedCorsOrigins = { "http://localhost:5300" },
    AllowRememberConsent = true,
    AllowedScopes =
    {
        "my-api"
    },
    RedirectUris = { "http://localhost:5300/swagger/o2c.html" }
}
Once the configuration is done we should be able to authenticate from Swagger, get redirected to our Identity Server endpoint to login, accept consent and get redirected back to our Swagger GUI where all endpoints protected should be accessible.
3. Handle endpoints specificities with filters
Swagger GUI is built from swagger.json which is auto generated. There are instances where it is not possible to auto generate the endpoint properly.
3.1 Operation filter for file input
For example, the handling of files formdata. If we have an endpoint taking files as input:
1
2
[HttpPost("Upload")]
public IActionResult Upload([FromForm]IEnumerable<IFormFile> files) => Ok();
The following representation is generated:
1
2
3
4
5
6
7
8
9
10
11
12
13
14
15
16
17
18
19
20
21
22
23
24
25
"/Bank/Upload": {
    "post": {
    "tags": [
        "BankAccount"
    ],
    "operationId": "BankUploadPost",
    "consumes": [],
    "produces": [],
    "parameters": [
        {
            "name": "files",
            "in": "formData",
            "required": false,
            "type": "array",
            "items": {},
            "collectionFormat": "multi"
        }
    ],
    "responses": {
        "200": {
            "description": "Success"
        }
    }
    }
}
It is not really useful as type is set as an array.
This get represented as followed:
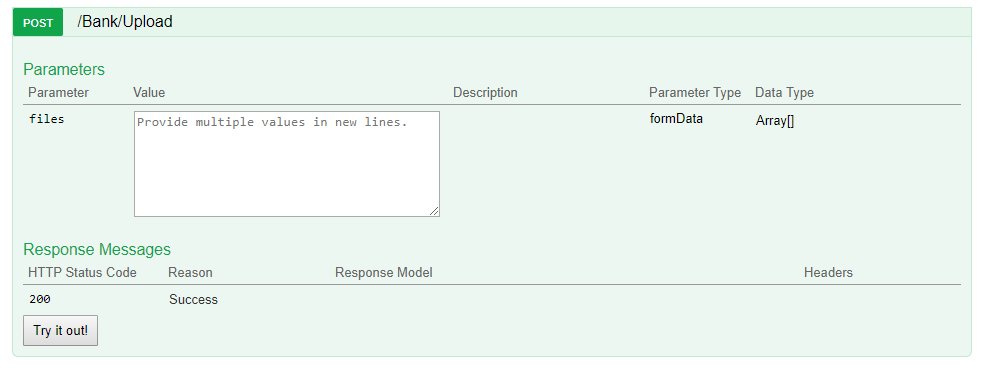
What we want is to be able to have a file input to directly upload a file from Swagger UI. In order to do that we will use an OperationFilter. An operation filter runs through all operations which we can then filter the one we wish to modify.
1
2
3
4
5
6
7
8
9
10
11
12
13
14
15
16
17
18
19
public class FileOperation : IOperationFilter
{
    public void Apply(Operation operation, OperationFilterContext context)
    {
        if (operation.OperationId == "BankUploadPost")
        {
            operation.Parameters = new List<IParameter>
            {
                new NonBodyParameter
                {
                    Name = "files",
                    Required = true,
                    Type = "file",
                    In = "formData"
                }
            };
        }
    }
}
There are 2 types of parameters, BodyParameter which is a json object and NonBodyParameter which allows us to set whatever we need to alter the swagger.json.
Then we register it in the swagger gen:
1
2
3
4
5
6
services.AddSwaggerGen(c =>
{
    c.OperationFilter<FileOperation>();

    // ... rest of the config
}
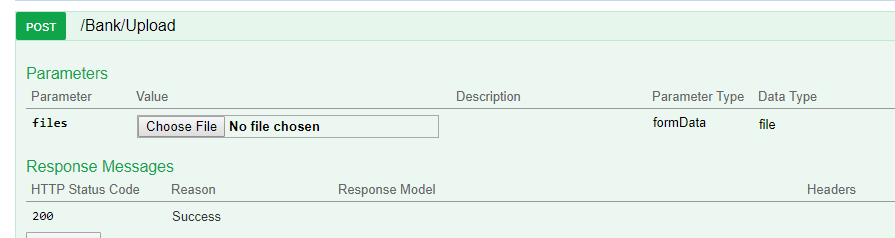
We are filtering using operationId BankUploadPost which is found in the swagger.json then we set the parameter as formData file. This then generate the following:
1
2
3
4
5
6
7
8
9
10
11
12
13
14
15
16
17
18
19
20
21
22
23
"/Bank/Upload": {
    "post": {
        "tags": [
            "BankAccount"
        ],
        "operationId": "BankUploadPost",
        "consumes": [],
        "produces": [],
        "parameters": [
            {
                "name": "files",
                "in": "formData",
                "required": true,
                "type": "file"
            }
        ],
        "responses": {
            "200": {
                "description": "Success"
            }
        }
    }
}
This json now results in the following form file input:
3.2 Schema filter for dynamic values
Another example would be if we have a string value which can be a particular set of data:
1
2
3
4
5
6
7
8
public class Property
{
public string Type { get; set; }
public string Value { get; set; }
}
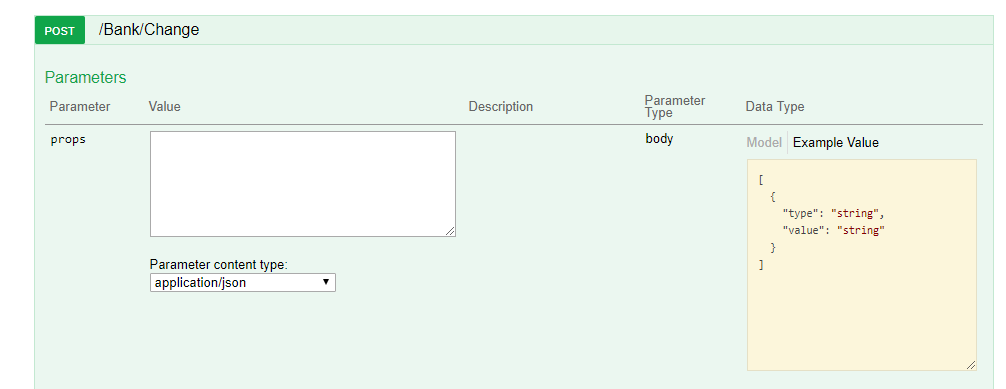
[HttpPost("Change")]
public IActionResult UpdateAccountProperty([FromBody]Property[] props) => Ok();
Where property can take the following form:
1
2
3
4
5
6
7
[{
    type: name
    value: kim
}, {
    type: age
    value: 30
}]
From the example provided, it is hard to tell that the type can either be name or age.
In order to display a better example, we can overwrite the auto generated by using a SchemaFitler.
1
2
3
4
5
6
7
8
9
10
11
12
13
14
15
16
17
18
19
public class PropertySchema : ISchemaFilter
{
    public void Apply(Schema model, SchemaFilterContext context)
    {
        if (context.SystemType == typeof(BankAccountController.Property))
        {
            model.Example = new object[] {
                new {
                    type = "name",
                    value = "string"
                },
                new {
                    type = "age",
                    value = "number"
                }
            };
        }
    }
}
And we register it on swagger gen:
1
2
3
4
5
6
7
services.AddSwaggerGen(c =>
{
    c.OperationFilter<FileOperation>();
    c.SchemaFilter<PropertySchema>();

    // ... rest of the config
}
Now our sample on Swagger UI will be as followed:
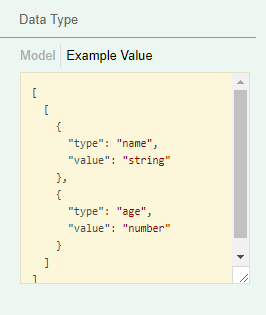
The example now is much more useful as it specifies that the type can be either name or age and for name the value must be string while for age the value is a number.
Conclusion
Today we saw how we could integrate swagger to our ASP NET Core project where it can be used to analyze the coherence of our Api and also easily test it through the intuitive Swagger UI. We also saw how we could configure it to support authentication with simple bearer or directly plug it to OAuth2 implicit flow with Identity Server. Lastly we saw how to customise the swagger.json generation using Operation filters to apply modification on the endpoint itself like parameters and using Schema filters to apply modification on the example schema generared. If you have any question leave it below! See you next time!


