Conemu A Better Command Prompt For Windows

When developing multiple Web api under multiple Visual Studio solutions, it can become very tedious to maintain, run and debug. Opening multiple instances of Visual Studio is very costly in term of memory and running all at once also clutter the screen which rapidly becomes irritating. With the advent of dotnet CLI tools, it has been clear that the next step would be to move out of the common “right click/build, F5” of Visual Studio and toward “dotnet run” on a command prompt. Last month I was looking for a Windows alternative of the bash terminal which can be found on Mac and I found ConEmu. ConEmu provides access to all typical shells via an enhanced UI. Today we will see how we can use ConEmu to ease our development process by leveraging only 2 of its features; the tasks and environment setup.
- dotnet CLI
- Setup environment
- Setup tasks
- Apply to multiple services
1. dotnet CLI
We can start first by getting ConEmu from the repository releases https://github.com/Maximus5/ConEmu/releases.
From now we can start straight using ConEmu as a command prompt. Multi tabs are supported by default, win + w hotkey opens a new tab.
Next what we can do is navigate to our Web API project and run dotnet run.
This will run the Web API service in the command prompt, here in ConEmu.
It is also possible to restore packages with dotnet restore and build a project without running with dotnet build.
When the project is ran, it is ran in production mode. This is the default behaviour since usually the production setup is the most restrictive one. In order to have the environment set to development we can set it by setting it in the current command prompt context:
1
set ASPNETCORE_ENVIRONMENT=Development
We would need to run this on every new command prompt window. If we want to persist it, we can set it as a global Windows variable but this will affect the whole operating system. Lucky us ConEmu provides a way to run repeated commands on start of prompt which we will see now.
2. Setup environment
At each prompt start, ConEmu allows us to run a set of commands. Those can be used to set environment variables or to set aliases which will exist only in ConEmu context.
In order to access the environment setup, go to settings > startup > environment and the following window will show:
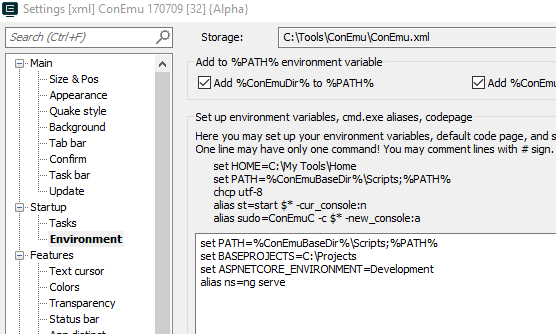
From here we can see that we can set variables, here I’ve set ASPNETCORE_ENVIRONMENT and also the base path of all my projects.
And I also set an alias ns which helps me to quickly serve an Angular app with Angular CLI ng serve.
ConEmuBaseDir is the base directory containing ConEmu files. As we can see, %ConEmuBaseDir%\Scripts is also set to the path. This \Scripts folder is provided by ConEmu and already set to path for us to place scripts in which are then easy access for our tasks.
Now that we know how to setup environment variables, we will no longer need to manually set the ASPNETCORE_ENVIRONMENT variable as it will be done automatically. What we still need to do is to navigate to our service and dotnet run the project manually. Lucky us, again, ConEmu has a way to automate that by creating a script and setting it to a hotkey with ConEmu tasks which we will see next.
3. Setup tasks
Let’s say we have a Web API located in C:\Projects\MyApi\MyApi.Web. In order to run it, we could do the following:
1
2
3
title My Api
cd C:\Projects\MyApi\MyApi.Web
dotnet run
This would set the title of the prompt to My Api then navigate to the service folder and run the project under development environment (since it was set in 2.).
What we can do now is put those 3 lines in MyApi.cmd file which we will place under ConEmu \Scripts folder.
1
\ConEmu\ConEmu\Scripts\MyApi.cmd
Since the \Scripts folder is added to PATH in each prompt, we should be able to launch it straight from anywhere.
1
> MyApi.cmd
This is already pretty neat as it cut down a lot of time for quick launching but we can go a step further by defining a task.
We start by opening the task settings settings > startup > tasks.
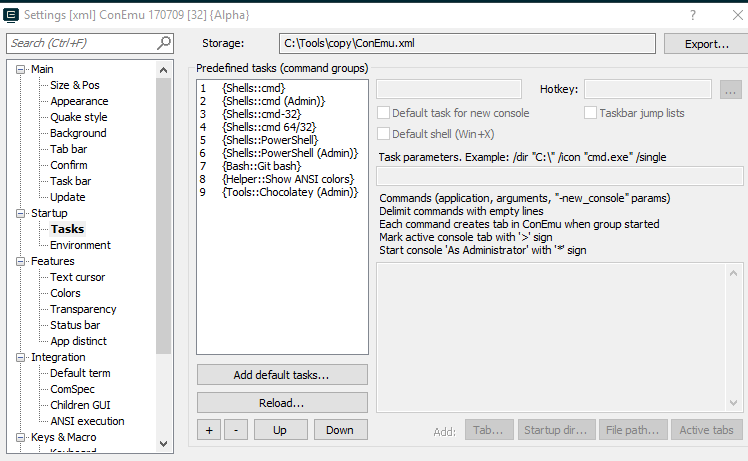
From there we can set a task which will start a new prompt and run the MyApi.cmd script.
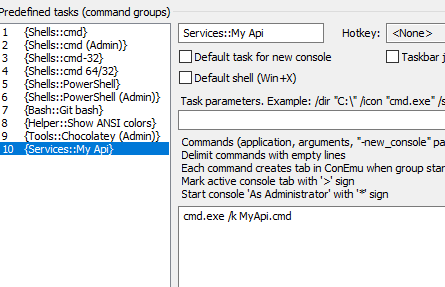
We do that by clicking on +, naming the service Services::My Api and adding the command cmd.exe /k MyApi.cmd.
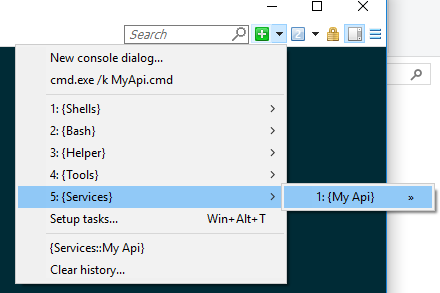
The naming convention allows grouping of tasks for easy access through the UI, [Group]::[Task] which is accessable from + on the main UI page.
A Hotkey can also be set with a combination of keys for even quicker access.
4. Apply to multiple services
All we have to do left is to create a script and task per service that we have.
We can then create a global task which we can call Services::Multi containing all services:
1
2
3
4
5
cmd.exe /k MyApi.cmd

cmd.exe /k MyApi2.cmd

cmd.exe /k MyApi3.cmd
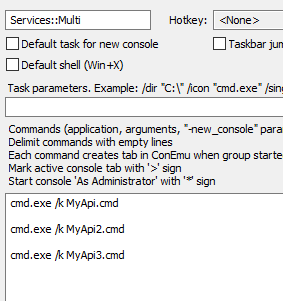
This task when ran will open 3 tabs and launch one script per tab which will result in a start of all services in one click.
Conclusion
Today we saw how to configure ConEmu to environment and task to allow us to start multiple services running ASP NET Core Web API in a single click. The ease of use and the support of multi tab make ConEmu a major contributor to reducing the amount of time wasted in development cycle. Hope you enjoyed reading this post as much as I enjoyed writing it. If you have any questions leave it here or hit me on Twitter @Kimserey_Lam. See you next time!


