Angular Progressive Web App

Progressive Web App allows an Angular website to be installed locally and be available on the app drawer and on the home screen of a phone. Today we will see how to use Angular Progressive Web App module to transform our app into a mobile app.
This post is composed by three parts:
Install @angular/pwa
To install the progressive web app package we use ng CLI in the root of the project:
1
ng add @angular/pwa
pwa stands for progressive web app. It will install @angular/pwa and @angular/service-worker.
The progressive web app comes with a default manifest.json created at the src of the project which defines the icon, the color theme and boundries of the app in regards to the website. For example this is a manifest.json generated for My App:
1
2
3
4
5
6
7
8
9
10
11
12
13
14
15
16
17
18
19
20
21
22
23
24
25
26
27
28
29
30
31
32
33
34
35
36
37
38
39
40
41
42
43
44
45
46
47
48
49
50
51
{
  "name": "My App",
  "short_name": "My App",
  "theme_color": "#1976d2",
  "background_color": "#fafafa",
  "display": "standalone",
  "scope": "/",
  "start_url": "/",
  "icons": [
    {
      "src": "assets/icons/icon-72x72.png",
      "sizes": "72x72",
      "type": "image/png"
    },
    {
      "src": "assets/icons/icon-96x96.png",
      "sizes": "96x96",
      "type": "image/png"
    },
    {
      "src": "assets/icons/icon-128x128.png",
      "sizes": "128x128",
      "type": "image/png"
    },
    {
      "src": "assets/icons/icon-144x144.png",
      "sizes": "144x144",
      "type": "image/png"
    },
    {
      "src": "assets/icons/icon-152x152.png",
      "sizes": "152x152",
      "type": "image/png"
    },
    {
      "src": "assets/icons/icon-192x192.png",
      "sizes": "192x192",
      "type": "image/png"
    },
    {
      "src": "assets/icons/icon-384x384.png",
      "sizes": "384x384",
      "type": "image/png"
    },
    {
      "src": "assets/icons/icon-512x512.png",
      "sizes": "512x512",
      "type": "image/png"
    }
  ]
}
We can see that it defines the following properties:
- the
name,short_nameandiconsdefines the look on the app drawer, the splashscreen and the popup to add to home screen for the app, - the
theme_colordefines the color used to tint the UI elements on mobile, it will define the tint of the address bar and the notification bar.theme_colordefined inindex.htmlwill overwrite the one defined inmanifest.json, - the
scopedefines the url scope of the progressive web app and where it should break back out to browser, here our whole website is meant to act as an app therefore the scope is the root/, - the
start_urldefines the path where the app should start on when launched, - the
displaydefines how the browser UI displays the app - herestandaloneindicates that it should look and feel like a native app, - the
background_colordefines the background color used on the splashscreen.
The full documentation can be found on Google documentation.
It should also be automatically added to the assests in angular.json under build and test architects.
To make sure that our manifest is found, we can run the application and look into the chrome debugger > Application section, we should be able to see our settings:

Service Worker Configuration
As we saw in 1), installing @angular/pwa with ng CLI also installed @angular/service-worker. A service worker brings offline capabilities to a web application. It can be viewed as a caching layer for HTTP methods. @angular/service-worker provides an abstraction over service worker which would normally be coded in Javascript. It allows us to configure the caching mechanism via a Json file called ngsw-config.json which can be found at the root of the project. Installing the package also registered the ServiceWorkerModule in the AppModule:
1
2
3
4
5
6
7
8
9
10
@NgModule({
  declarations: [AppComponent],
  imports: [
    ...
    ServiceWorkerModule.register('ngsw-worker.js', { enabled: environment.production })
  ],
  providers: [],
  bootstrap: [AppComponent]
})
export class AppModule { }
environment.production points to the default environment settings which is a boolean true when building for production with ng build --prod. The service worker will only be enabled for production. ngsw-worker.js is the default service worker script used which comes in @angular/service-worker package.
It also automatically add a configuration in production under the build architect for "serviceWorker": true in angular.json which will setuo Angular CLI to build the application augmented with service worker. We can leave the angular.json setting to true and when we need to disable service worker, we can set { enabled: false } on the module registration which will make the application act as if service worker was not supported by the browser.
Lastly it also added the ngsw-config.json at the root:
1
2
3
4
5
6
7
8
9
10
11
12
13
14
15
16
17
18
19
20
21
22
23
24
25
26
{
  "index": "/index.html",
  "assetGroups": [
    {
      "name": "app",
      "installMode": "prefetch",
      "resources": {
        "files": [
          "/favicon.ico",
          "/index.html",
          "/*.css",
          "/*.js"
        ]
      }
    }, {
      "name": "assets",
      "installMode": "lazy",
      "updateMode": "prefetch",
      "resources": {
        "files": [
          "/assets/**"
        ]
      }
    }
  ]
}
The ngsw-config sets the caching policies for the service worker. It is composed by five properties, here is the typescript interface which the json deserialize to:
1
2
3
4
5
6
7
export interface Config {
    appData?: {};
    index: string;
    assetGroups?: AssetGroup[];
    dataGroups?: DataGroup[];
    navigationUrls?: string[];
}
appDatais an object that can be used to store any data which will be available in theUpdateAvailableEventandUpdateActivatedEventfrom theSwUpdateservice.indexdefines the index page which will be use for navigation.assetGroupsdefines the caching for the assets in the application, by default it defines two groups - the files composing the application and the static resources.installModedefines how the resources are being downloaded on installation andupdateModedefines how the resources are being updated when they have changed.prefetchwould download them as soon as changes were made whilelazywould download them on demand as they are requested.dataGroupsdefines the caching for data related requests, like API requests.
The difference between assetGroups and dataGroups is that assets compose the application and each asset is versioned with a hash key. Any change in those files will yield a different hash which will indicate to service worker that the version of the app changed and one of the file needs to be downloaded. dataGroups on the other end represent the data which are separated from the application version. But on their own, data have a version as well which can be used to maintain compatibility between app version and data version for situation where upgrade of API aren’t backward compatible.
In our example, our app has API calls to /api/persons and /api/companies therefore we need to define those as dataGroups:
1
2
3
4
5
6
7
8
9
10
11
12
13
14
15
16
17
18
19
20
21
22
23
24
25
26
27
28
29
30
31
32
33
34
35
36
37
{
  "index": "/index.html",
  "assetGroups": [
    {
      "name": "app",
      "installMode": "prefetch",
      "resources": {
        "files": [
          "/favicon.ico",
          "/manifest.json",
          "/index.html",
          "/*.css",
          "/*.js"
        ]
      }
    }, {
      "name": "assets",
      "installMode": "lazy",
      "updateMode": "prefetch",
      "resources": {
        "files": [
          "/assets/**"
        ]
      }
    }
  ],
  "dataGroups": [
    {
      "name": "api",
      "urls": [ "/api/**" ],
      "cacheConfig": {
        "maxSize": 100,
        "maxAge": "1m"
      }
    }
  ]
}
Here our API and webapp are both hosted under the same domain therefore it is necessary to define the dataGroups, when browsing mysite.com/api/persons, the service worker will kick in and forward the route to the Angular router which will fail as no such route exists.
We are now done with setting up the service worker. To be able to test it, we need to build in prod:
1
2
ng build --prod
http-server dist\service-worker-test
We use http-server to host locally our dist folder containing the production build of our app.
Service Worker in Action
In action, the file dictating how the browser should act is the ngsw-config.json. It is downloaded every time the app is launched or the website is opened.
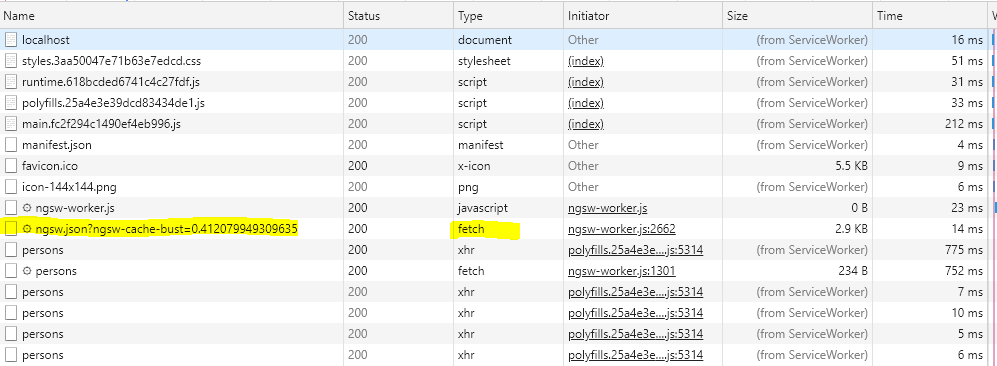
As a side note, we can see that the default behavior for assets is installMode: lazy/updateMode: prefetch and for the application is installModle: prefetch/updateMode: prefetch. We can also see the hash generated in the hashTable property.
And for the API calls, we can see that when a request to /api/persons is made, it is first fetched and subsequent calls are instantly returned from the service worker. After a minute as we set, another fetch will occur.
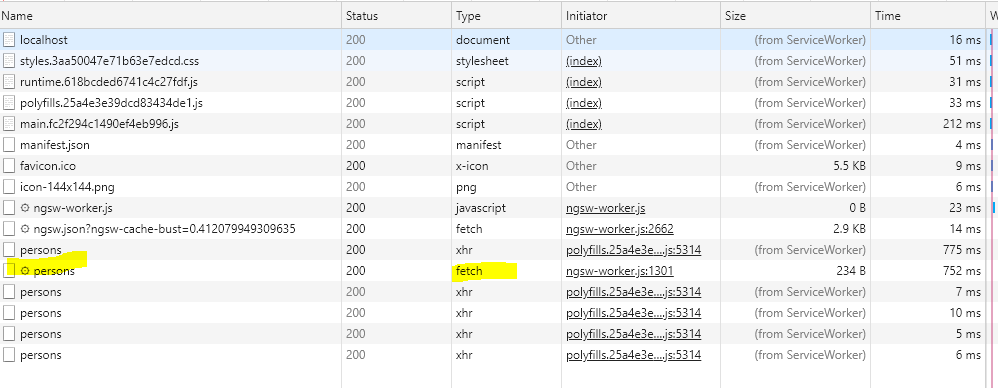
When the application updates, once relauched, the new version will be updated as the behavior for the application is prefetch.
Conclusion
Today we saw how we could setup our Angular application to become a Progressive Web App, we started by looking at how we can install the packages needed on Angular using the angular CLI. Then we moved on to configuring a manifest.json which sets look and feel for the application, then we moved on to configuring the behavior of the service worker which provides offline capabilities and lastly we saw how the service worker acts on the browser itself. Hope you liked this post, see you on the next one!


